Building bare-metal C programs for DE10-Nano development kit with Eclipse IDE for Embedded C/C++ Developers
Introduction
This began from wanting to create a project with the DE10-Nano development board (Intel Cyclone V SoC-FPGA) for data acquisition. In my design I wanted to use the FPGA side for capturing medium fast ADC samples (100MS/s) from an external ADC board, and use the HPS side with its built-in USB 2.0 or 1GB ethernet to send data to a PC as fast as possible.
Such a project would require the ability to transfer data from the FPGA side to the HPS side where the USB and ethernet exists. One solution is to use configured Linux (e.g. Angstrom) system from a SD card or flash memory. I could modify the Linux device tree to reserve a block of RAM for the FPGA ensuring it won't be used by Linux. Next, edit the Linux boot script to call memmap (kernel command) to map the reserved kernel address space to a user address space, or alternatively map using the C mmap() function (linux system call) with a Linux program on /dev/mem (device file to physical memory). Then finally develop a Linux program to access the user address space. To be honest, my Linux setup skills are not that good and it would be a lot to learn - I'm going to leave that for a rainy day.
Searching for another solution, I see that Intel provides us with "SoC FPGA HWLib" - a library which supports the SoC-FPGA hardware. Note, for DE-10 (Cyclone V) we would use the hwlib from the armv7a folder. The library is for bare-metal C programming, which is essentially low level programming, and is frequently used in the embedded MCU development world. Because I have developed programs for the PIC and STM32 MCUs in the past, this is an interesting route to pursue.
This brings us back to the original topic of building bare-metal C progamming. I have found a few SoC-FPGA bare-metal guides on the Internet but all of them require Arm DS-5 IDE, which is now superseded by Arm Development Studio. DS-5 or Arm Development Studio is a commercial product and requires a paid license to work. In the past, Arm offered a 30 day free trial but this is no longer available! Anyway, for hobbyists a commercial route is not a suitable path.
I have been building DE10-Nano programs the hard way: through commandline and plain text editor. My build flow was running a GNU C/C++ toolchain using a few Bash shell scripts on Ubuntu Linux, and running tests using SD card images with printf debugging by outputting debug messages to the serial UART. Having to physically switch the SD card between the PC and the dev kit was very time-consuming, and also without break points debugging it was very difficult to fix complex problems. I wanted something like DS-5; an IDE that builds, uploads elf, run and debug with the click of a button.
After a year, I have finally found a solution! My guide will show you how to setup the various tools so that you can build, run and debug using the widely known Eclipse IDE for Embedded C/C++ Developers.
1. Getting the pre-requisite tools and files
Files
- xPack GNU Arm Embedded GCC or Arm GNU toolchain for C/C++
- Eclipse IDE for Embedded C/C++ Developers
- xPack Windows Build Tools or GnuWin32 Make
- xPack OpenOCD or OpenOCD
- Quartus Prime Programmer and Tools or Quartus Prime Lite" (Required just for the USB Blaster II driver)
- OpenOCD tcl target script for DE10-Nano
- Hello, World semihosting example
In this guide we will be using Windows host for our development. All of these tools are available for Linux so it should be straight forward to adapt these steps for Linux. We start by getting the required tools.
| 1.1. Get Arm GNU toolchain for C/C++ | |
|---|---|
|
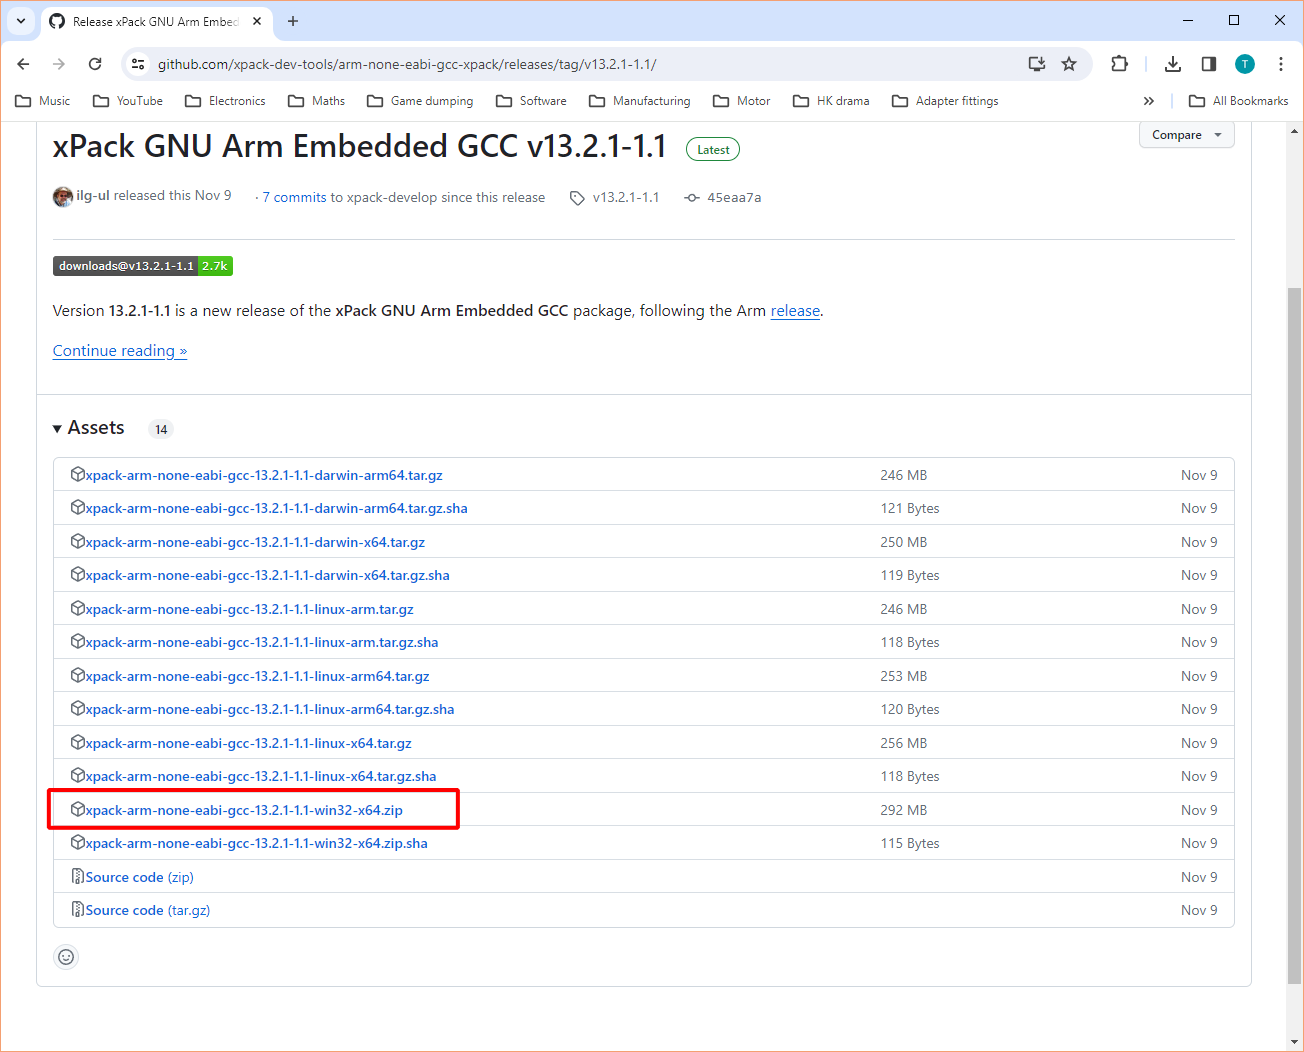
Toolchain is a set of tools for building the C/C++ source code, it includes the compiler, linker, disassembler, GDB, and other useful tools. Download a version for Windows ("win32-x64" in the file name) from xPack GNU Arm Embedded GCC releases and extract it to a folder of your choice. For the purpose of this guide we are using v14.2.1-1.1 and is extracted to "C:\devtools\xpack-arm-none-eabi-gcc-14.2.1-1.1" Note The official GNU Toolchain for Arm distribution is open source so there exists variants of it. We are using xPack's version in this guide, but you may prefer another, e.g. Arm's own version. There are other variants such as Linaro Arm GNU toolchain (Linux host only) which is abandoned, Code Sourcery ARM Toolchain (Linux host only), any of these can be used instead but may have small differences. |
|
| 1.2. Get Eclipse IDE for Embedded C/C++ Developers | |
|---|---|
|
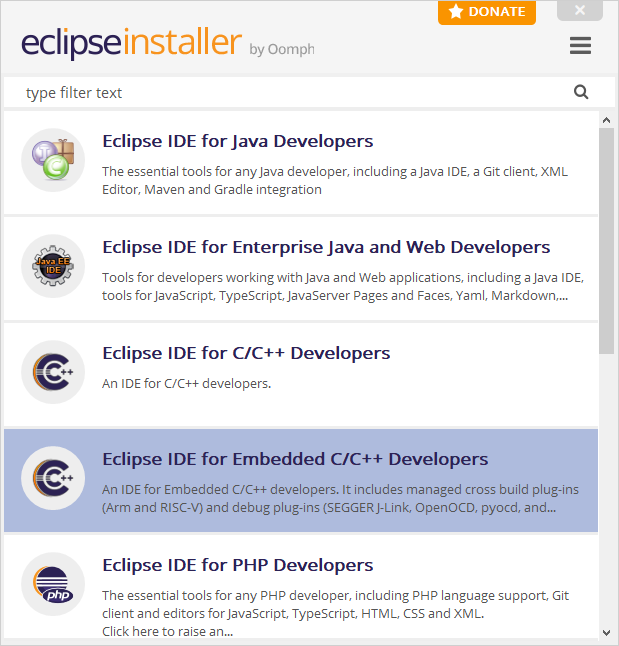
Eclipse IDE for Embedded is used by many microcontroller manufacturers. Most manufacturer's offer their own IDE but many are actually a customised version of this. Download the Windows x86_64 installer from Eclipse IDE Installer Run the installer, during the install select "Eclipse IDE for Embedded C/C++ Developers", which will install a version of Eclipse and plugins taylored for embedded C/C++ programming. Note: On Ubuntu you must trust all source links, which you can do so within the installer from the menu and tick "Trust all content", or within Eclipse IDE from the menu "Windows/Preferences" then in the dialog "Install/Update/Trust" then tick "Trust all content" In this guide we will simply call this Eclipse. |
|
| 1.3. Get Windows port of GNU Make |
|---|
|
This is a Windows port of the GNU make utility. The GNU make utility is a popular scripting tool for automating C/C++ development on Linux. It is the interpreter for GNU "make" scripts, which enables the script to run. On Linux the make scripting language is a popular choice for automating the task of executing tools to build programs. It provides prerequisite (timestamp update dependency) logic for rules (conditions) more suitable for updating the build process, e.g. you want to only compile objects that are out of date to the sources. The main problem is that scripting languages, e.g. Bash, KornShell, Borne shell, MSDOS, PowerShell do not provide such built-in logic. Eclipse itself requires a build tool - one that it supports. We will set it up to use this tool. We will use xPack's version which is a more complete port than the GnuWin32 one. Download a release version from xPack Windows Build tools releases and extract it to a folder of your choice. For the purpose of this guide we are using v4.4.1-3 and is extracted to "C:\devtools\xpack-windows-build-tools-4.4.1-3" |
| 1.4. Get the driver for USB Blaster II programming adapter |
|---|
|
The USB Blaster II is the official programming JTAG adapter for Intel FPGAs, and it is already integrated on the DE10-Nano board. It requires a driver and the firmware file blaster_6810.hex to work. The driver and firmware file comes bundled with "Quartus Prime Programmer and Tools" and also "Quartus Prime Lite", and so you can install either one. If you're not going to use "Quartus Prime Lite", you may prefer the smaller size of "Quartus Prime Programmer and Tools". During the setup just make sure to include the driver as part of the installation. OpenOCD requires the path to the blaster_6810.hex file to be specified. Since the installation of Quartus creates environment variable QUARTUS_ROOTDIR or QSYS_ROOTDIR for us, I've added TCL code to the default target script (altera-usb-blaster2.cfg) to use these to find the path of the blaster_6810.hex file. In this guide we will simply call "Quartus Prime Lite" as "Quartus Prime". |
| 1.5. Get OpenOCD | |
|---|---|
|
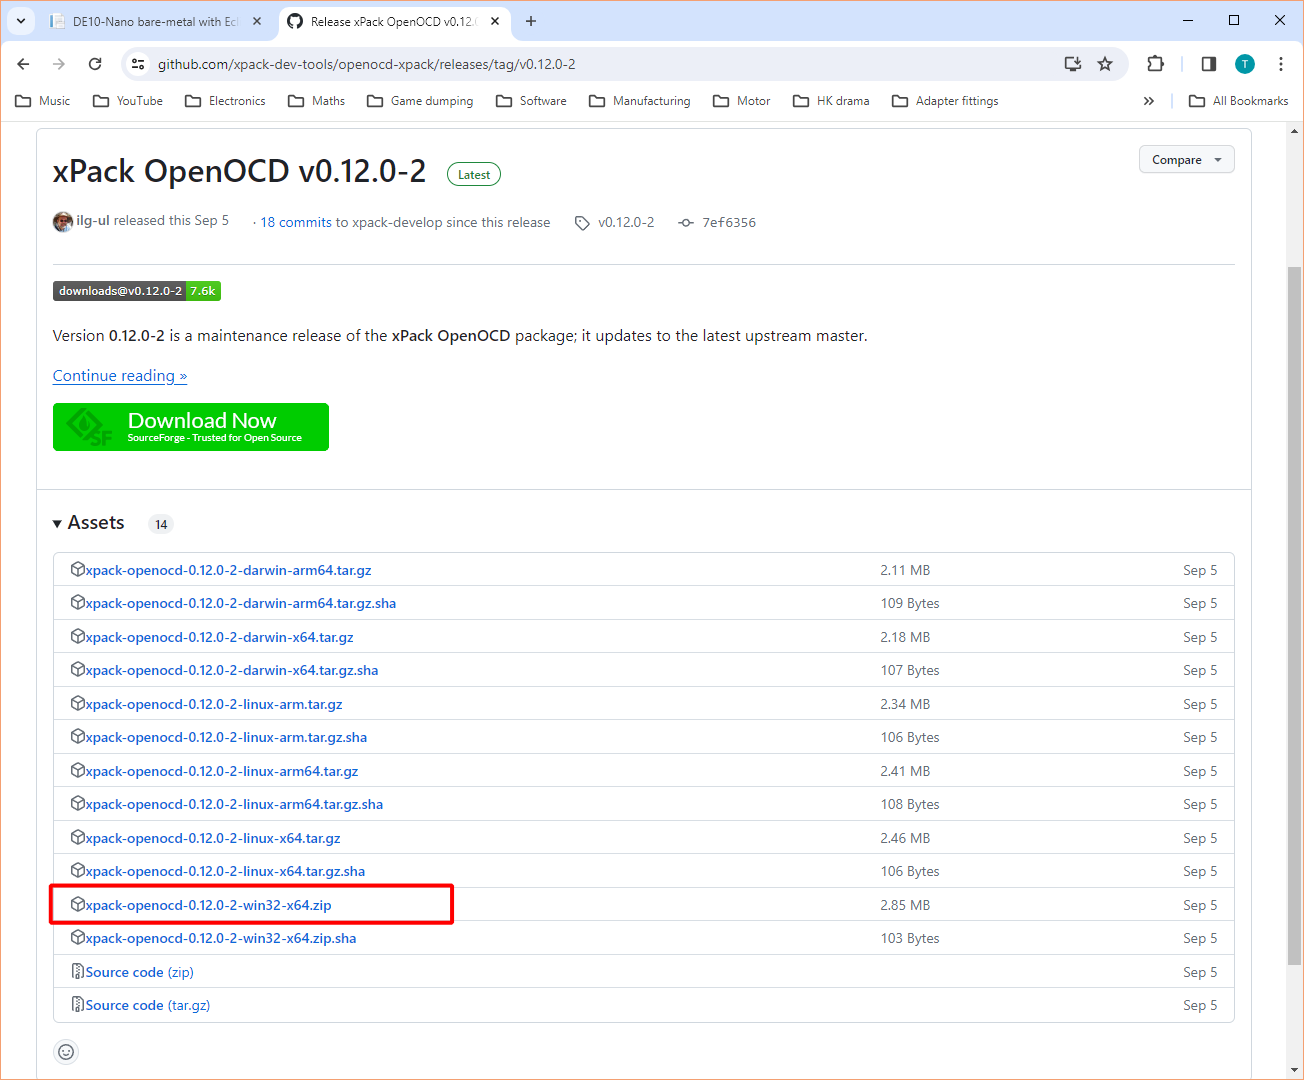
This is a popular low level layer debugging software for embedded devices. It is able to communicate with hardware debug adapters and send debug commands or signals to control the target processor. It understands the low level industry standards JTAG/SWD/Arm CoreSight commands and has support for various debug adapters. Eclipse supports the OpenOCD debugging software. The github OpenOCD master branch contains the latest commits (changes) but normally is ongoing code so I prefer to use a Release version instead. I am too lazy to build OpenOCD from the source files so will use xPacks's binary release. Download a version from xPack OpenOCD releases and extract it to a folder of your choice. For the purpose of this guide we are using v0.12.0-7 and is extracted to "C:\devtools\xpack-openocd-0.12.0-7" |
|
|
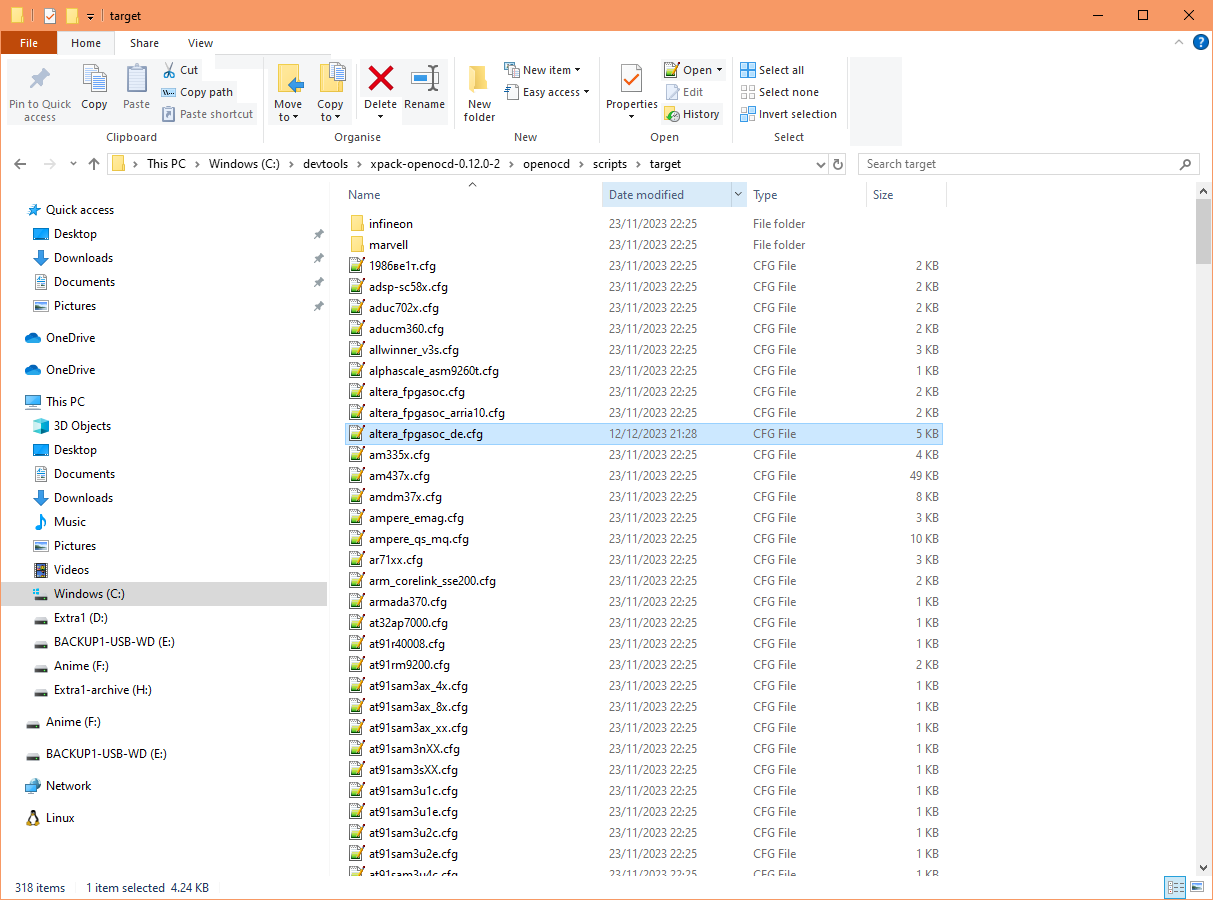
At this time, OpenOCD does not include a target script file for the DE10-Nano, download it from my github: DE10-Nano scripts. Download and extract the scripts "altera_fpgasoc_de.cfg" and "altera_fpgasoc_de_dual.cfg" (from the openocd-config-scripts/target folder) into the "target" of your OpenOCD installed folder. In this guide the location is: Also:In newer versions of OpenOCD it no longer searches for the USB Blaster II firmware (blaster_6810.hex found inside bin, bin64 or linux64 in the Quartus Prime installation folder), so you have two options:
|
|
| 1.6. Get "Hello, World" semihosting example |
|---|
|
This contains my example source code with Eclipse project. Download from the pre-requisite list above. Extract it to a folder of your choice. For the purpose of this guide it is extracted to "D:\Documents\de10nano-baremetal-guide" |
2. Setting up Eclipse IDE for Embedded C/C++ Developers
Eclipse is really only the editor and the integration, it relies on external tools for the compiling, scripting and debugging.
In this step we will setup some global settings, but note, this only needs to be setup once. Note, the global settings are saved to the workspace directory, not your project directory.
| 2.1. Start Eclipse | |
|---|---|
|
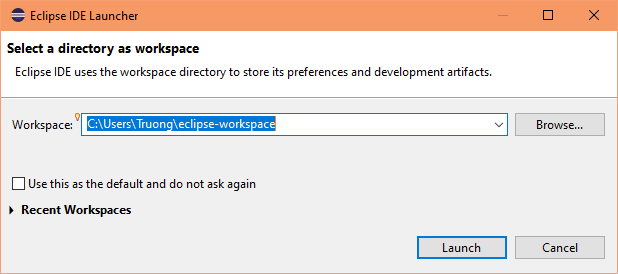
When starting Eclipse it will prompt for a workspace location. We will use the default, just click the "Launch" button, and tick remember my decision if you would like. |
|
| 2.2. Display the global settings | |
|---|---|
To bring up the global settings dialog:
|
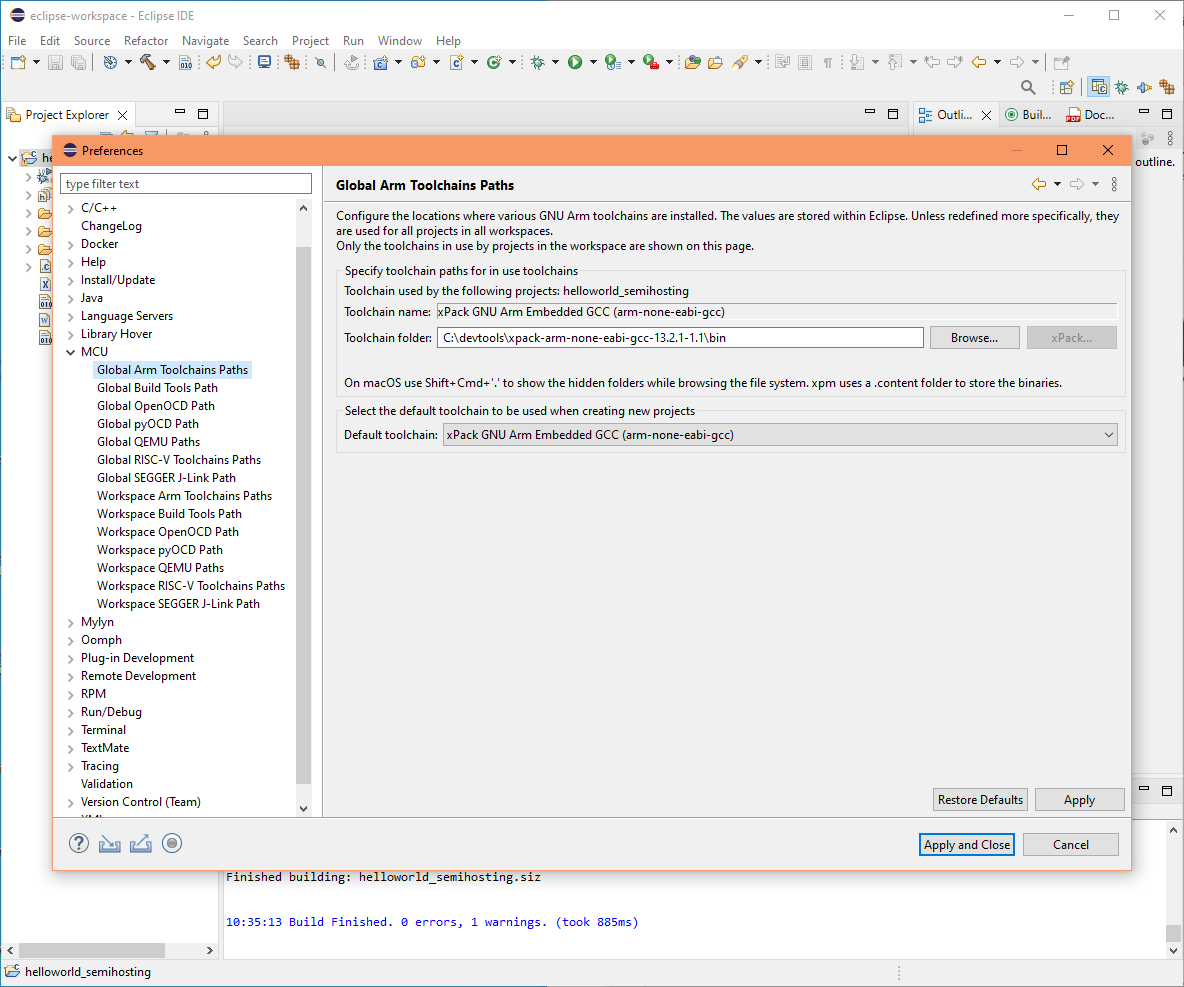
| 2.3. Set global toolchain path | |
|---|---|
Steps:
|
|
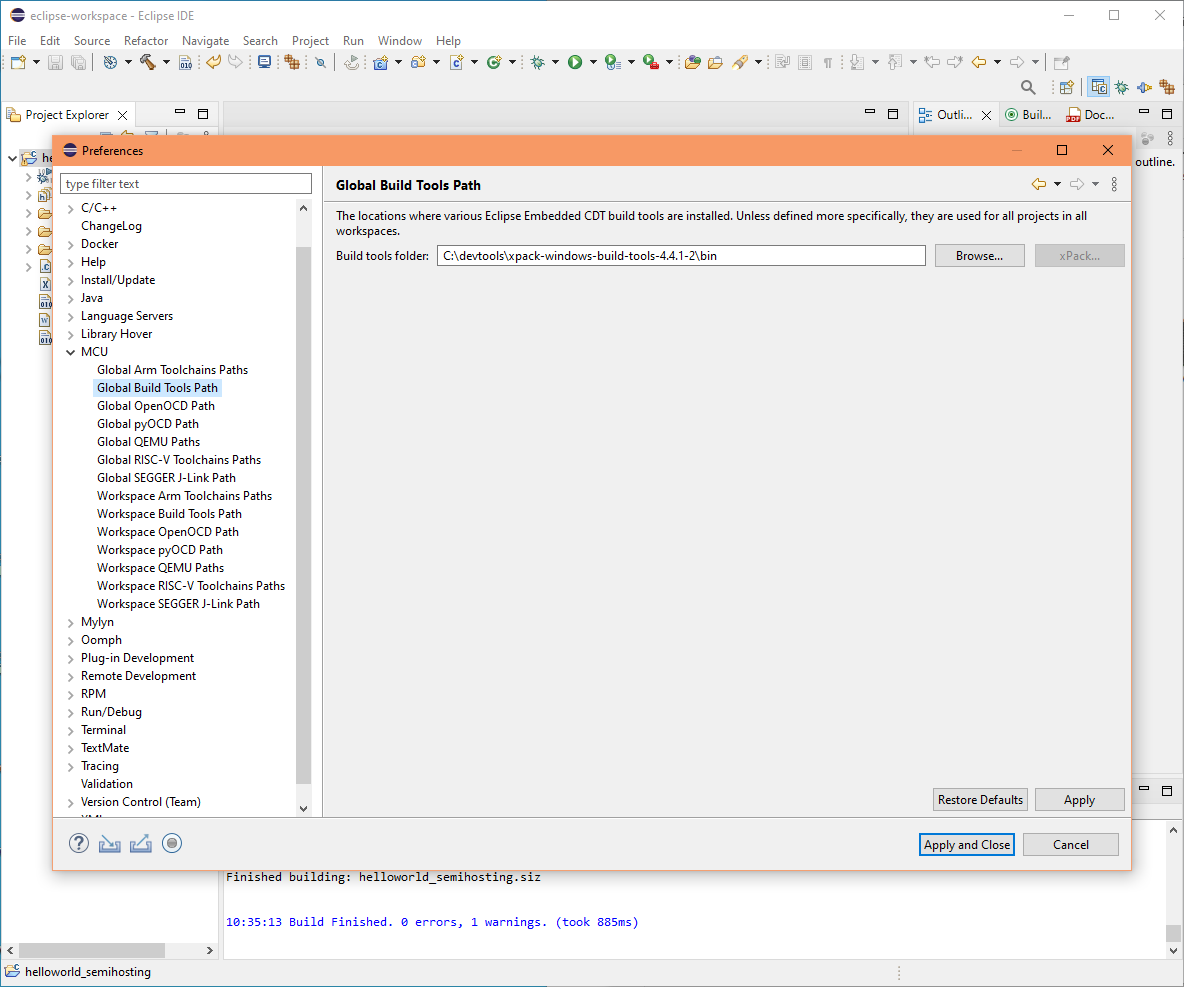
| 2.4. Set global build tools path | |
|---|---|
Steps:
|
|
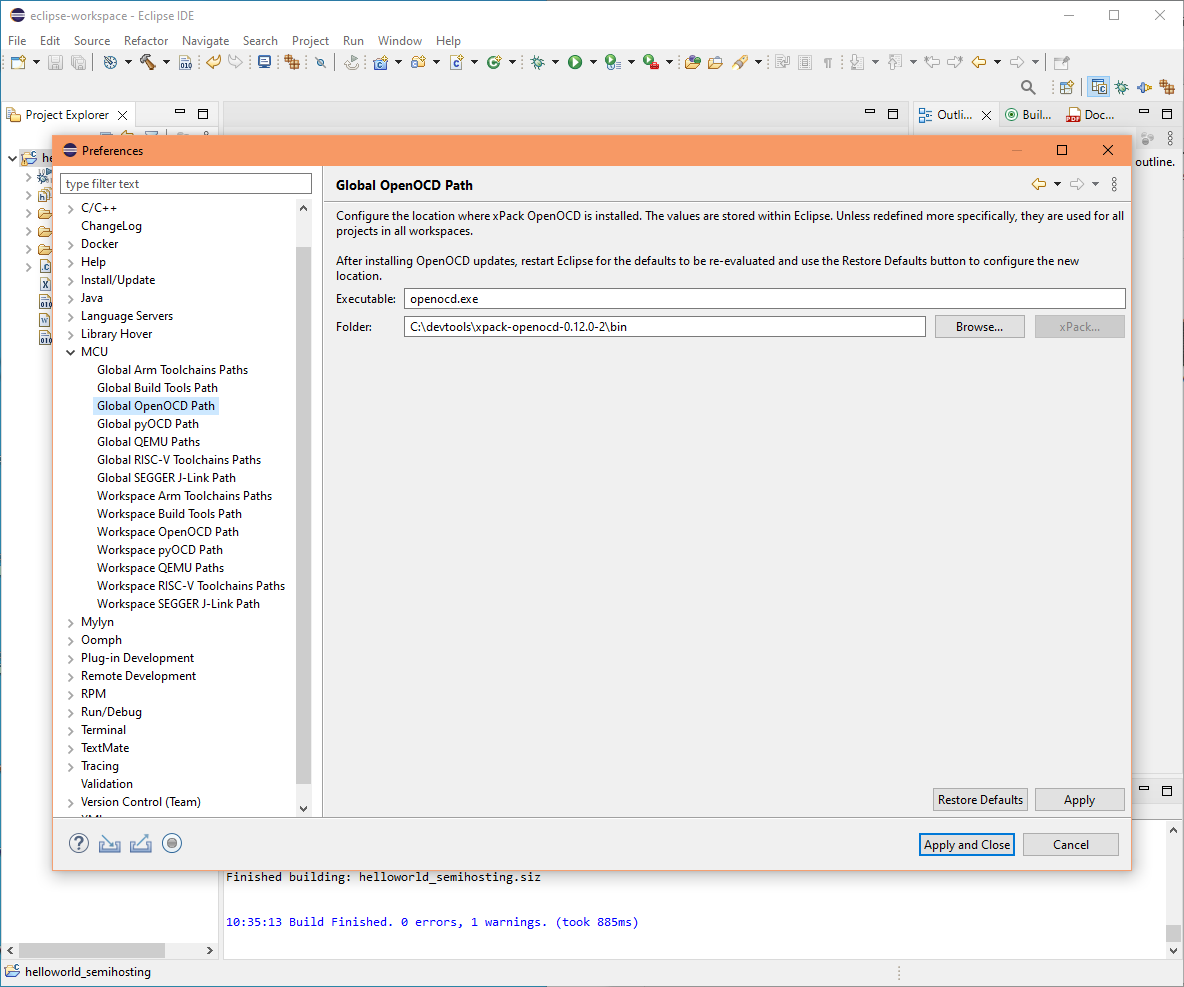
| 2.5. Set the global OpenOCD path | |
|---|---|
Steps:
|
|
3. Building (compiling) the example source files
At this stage, we would normally create a new C project, but first we will look at some basic tasks with the use of my ready made example project.
| 3.1. Import the "Hello, World" semihosting example project | |
|---|---|
Steps:
|
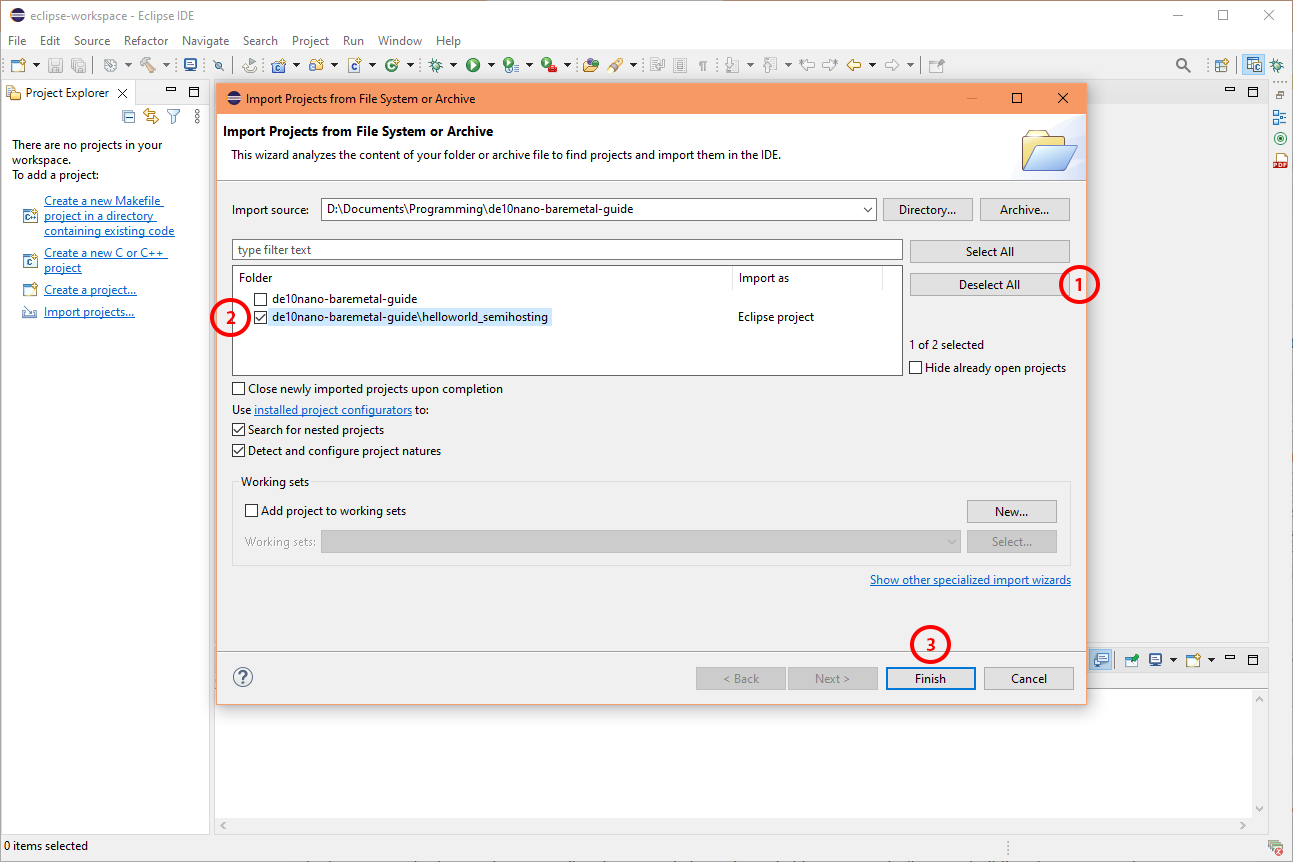
|
| 3.2. Build using the DebugSemihosting build configuration (profile) | |
|---|---|
|
On the toolbar there is a hammer icon - this is the build icon. Also, just next to it is a down-arrow icon - this is the build configuration select icon. It should be defaulted to the Debug configuration, let's change it. Click the dropdown next to the hammer and select "DebugSemihosting" to switch. Notice switching automatically starts building the source code. If successful, you should see a message in the build console like this: "Build Finished. 0 errors, 1 warnings. (took 885ms)" Ignore the 1 warning regarding the load segment with RWX permissions. That refers to the permissions of the On-Chip RAM load section defined in the linker file. |
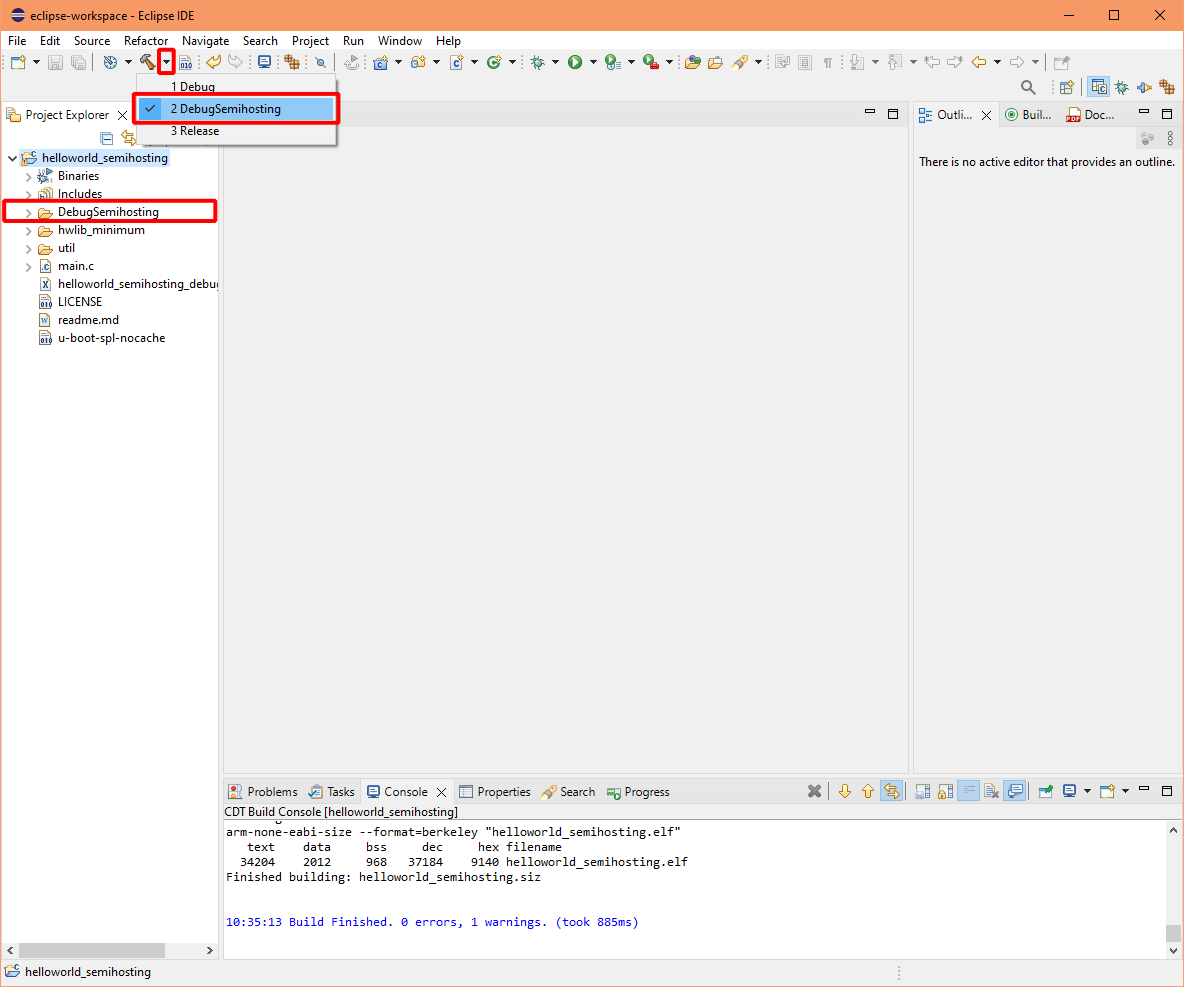
|
4. Running and debugging
| 4.1. Set a debug breakpoint | |
|---|---|
|
As an exercise, we will set a breakpoint, this will halt the execution at that point (location), and will enable us to begin stepping lines of code within the counting loop. The vertical space to the left of the line numbers can be used to set or unset breakpoints:
Note: A breakpoint will only work where there is code. Eclipse is not able to prevent setting invalid breakpoint locations - it is not within their control, the toolchain would need to support such a feature. |
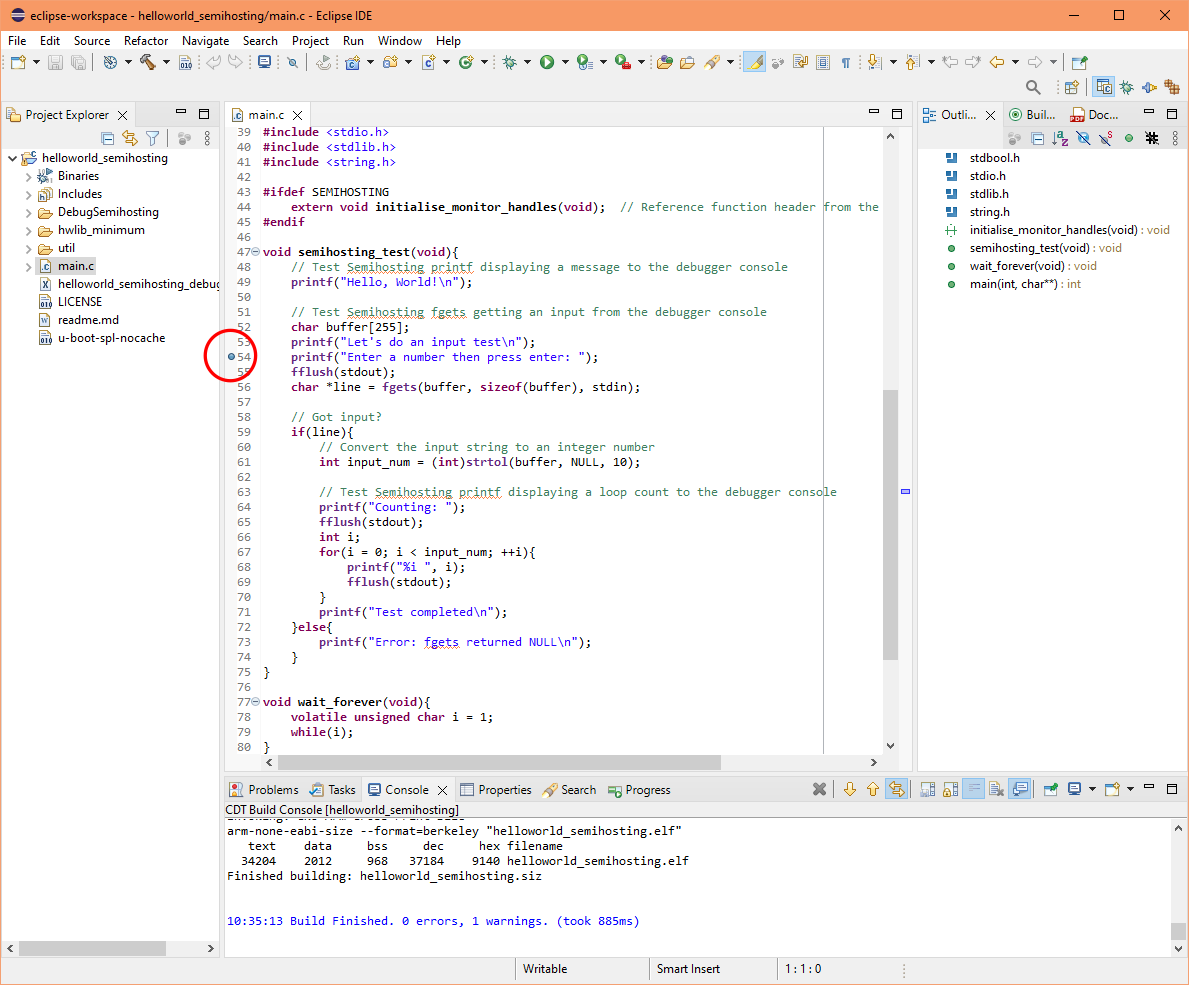
|
| 4.2. Connect the USB Blaster II (J-TAG adapter) |
|---|
|
The compiled elf program will not run on your PC, if we wish to run and debug the elf from the PC we will need to use an emulator, such as QEMU, or use debug tools, such as OpenOCD and GDB, we will use this latter option. First we need to prepare the board:
|
| 4.3. Debug configuration | |
|---|---|
|
In the hello world project you will find my pre-configured GDB & OpenOCD eclipse debug configurations. To start a debug session in Eclipse:
|
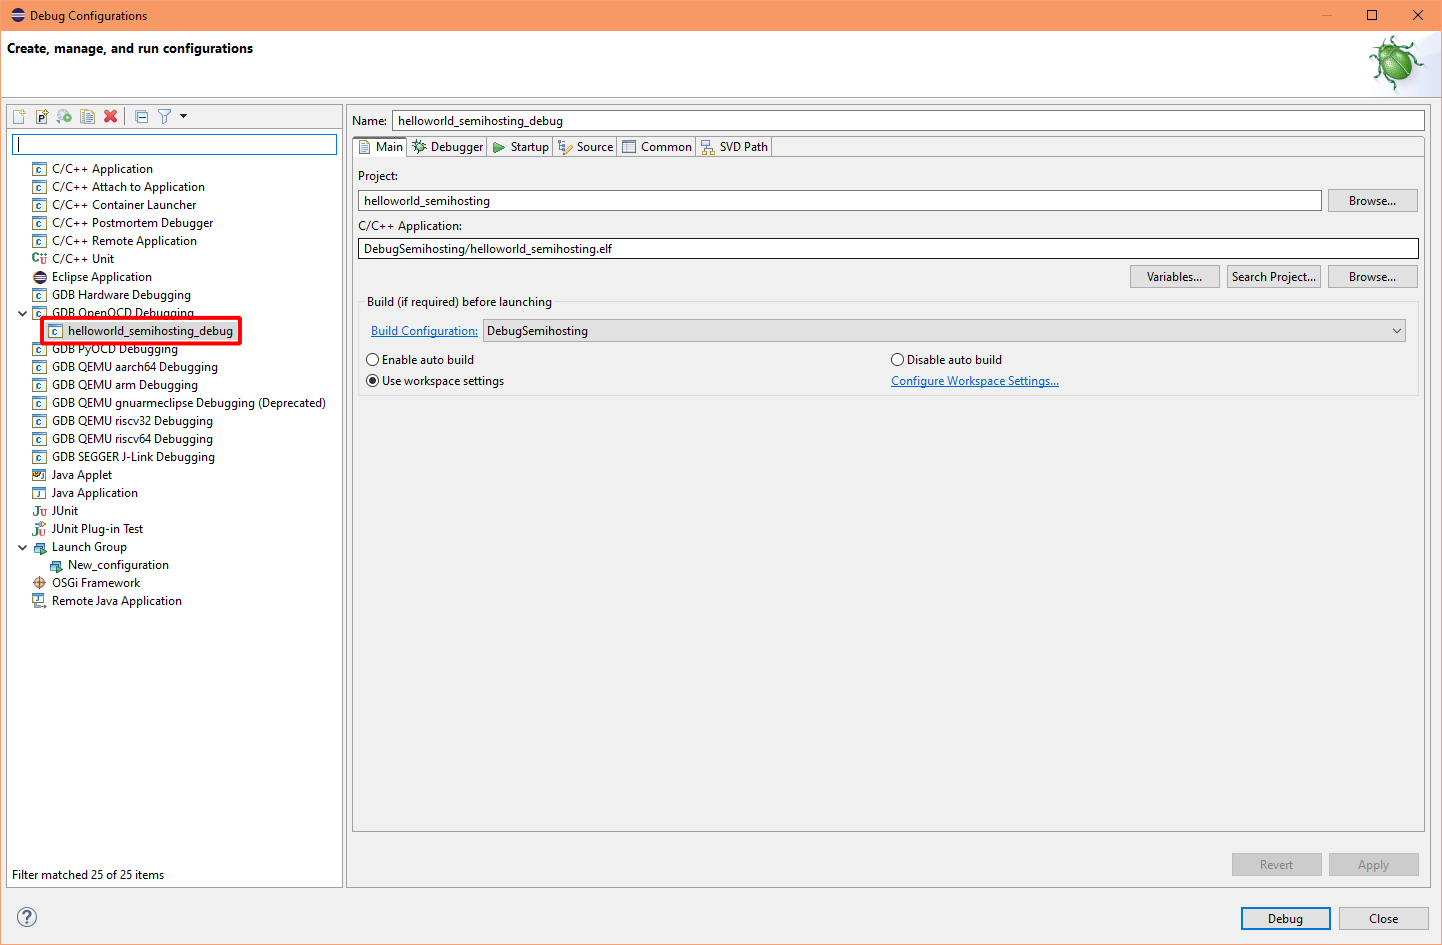
|
| 4.4. Break on main | |
|---|---|
The debug process takes a bit of time to get ready. In the background it does quite a bit:
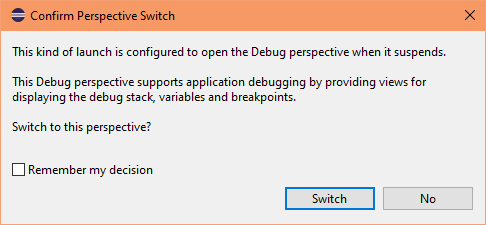
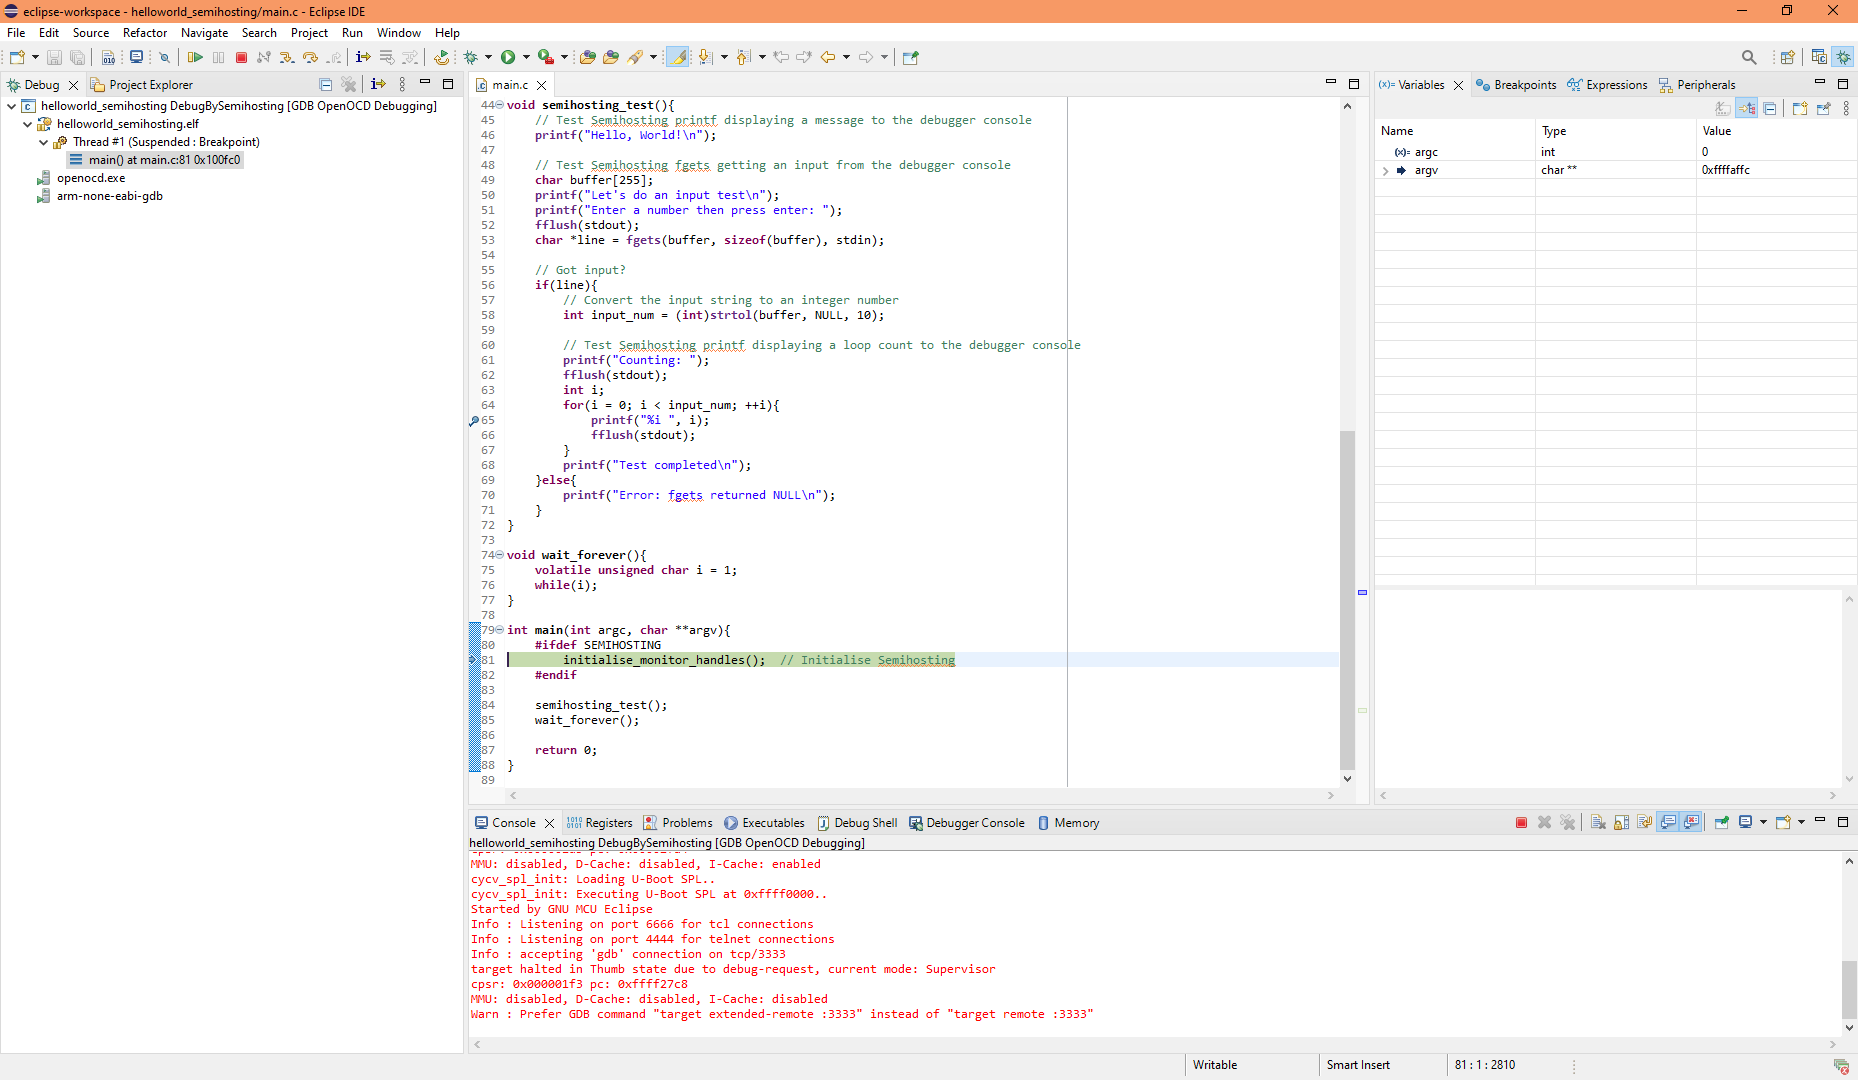
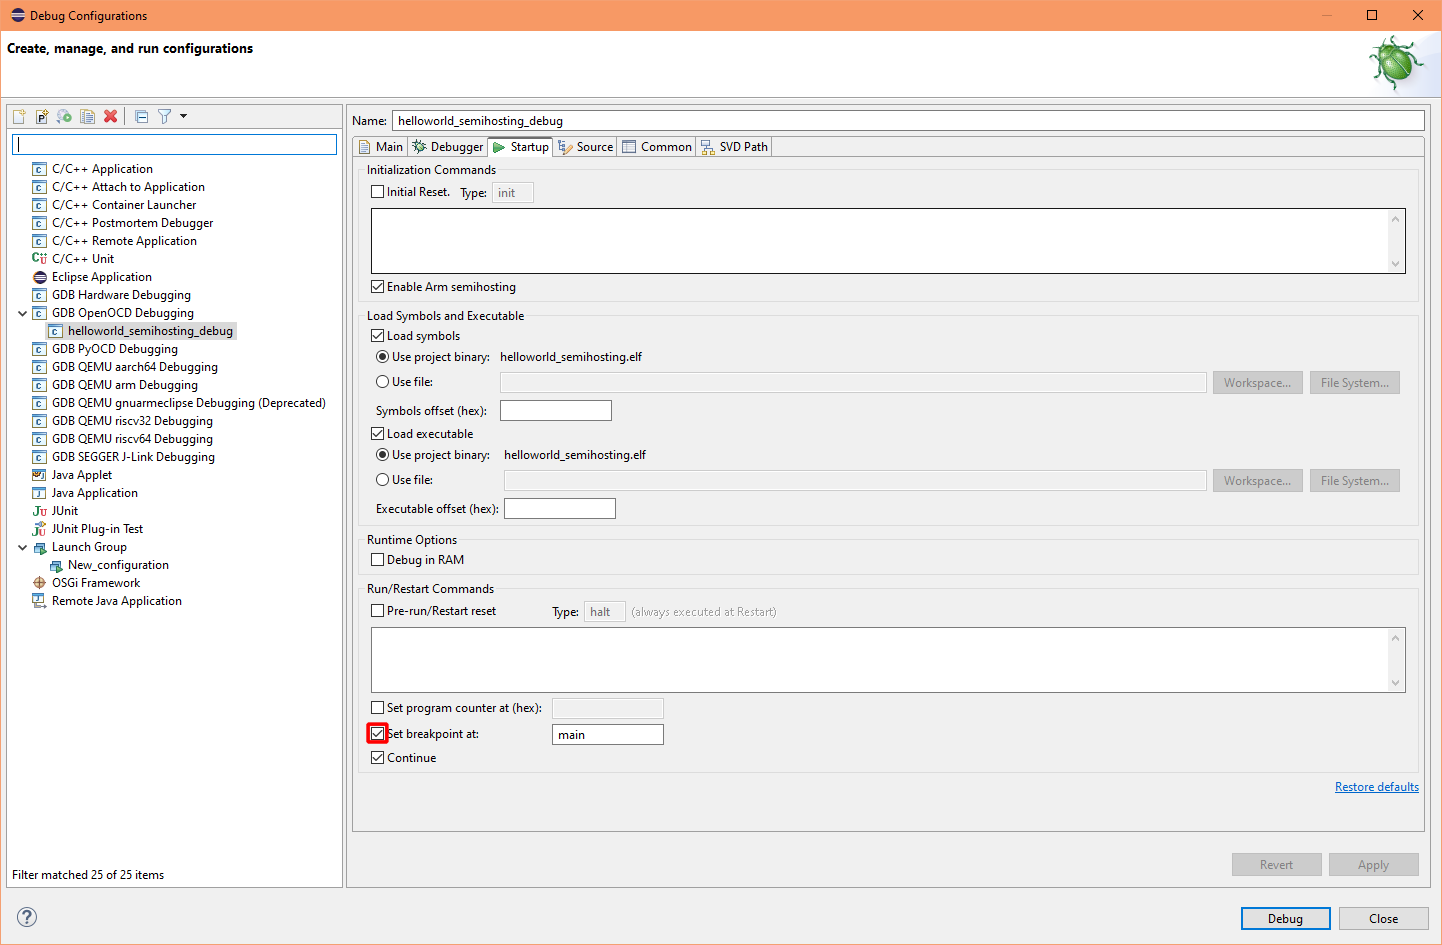
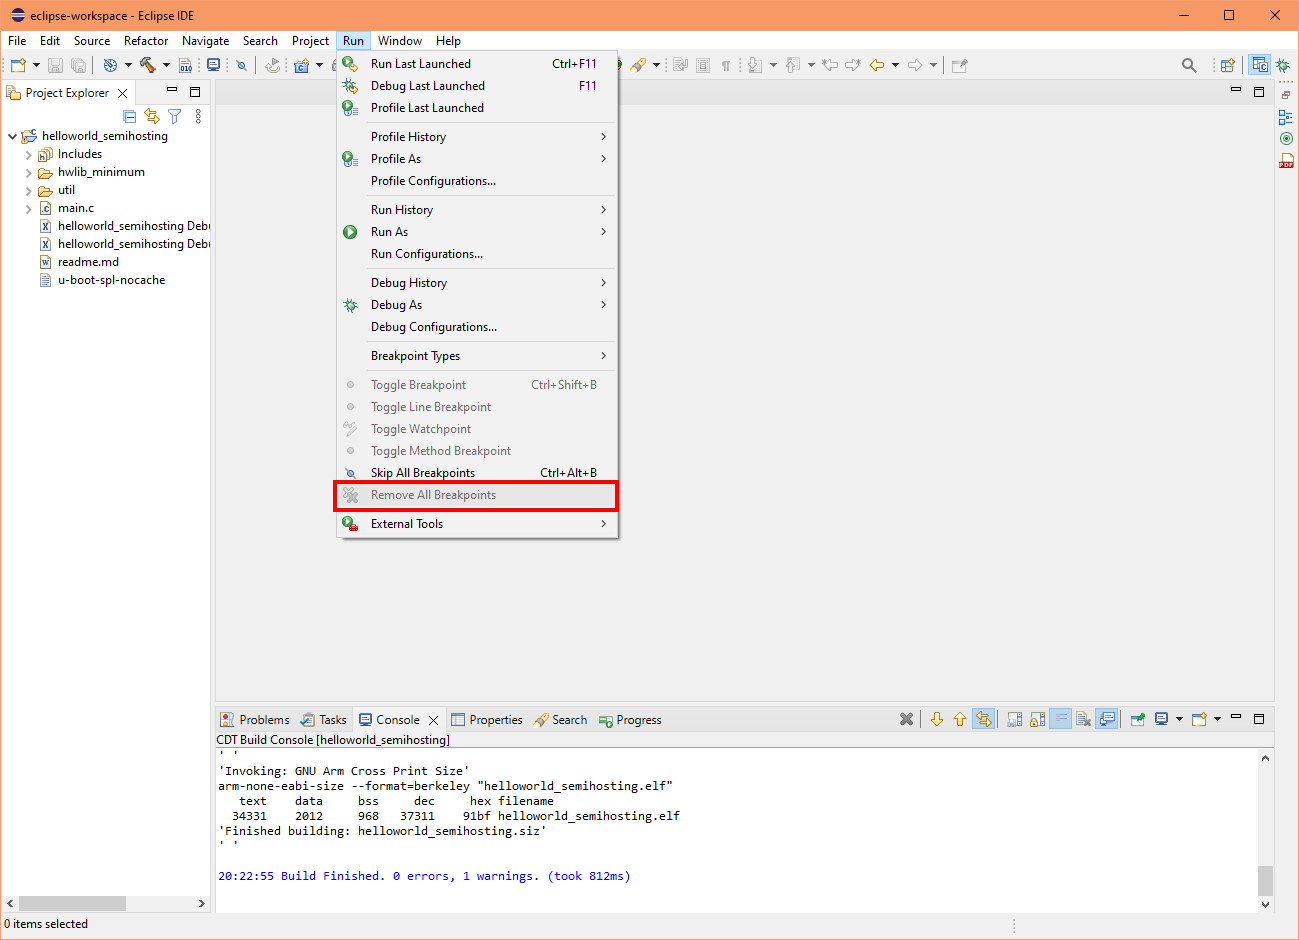
When ready, your program should now be running on the DE10-Nano board. The execution is halted at a breakpoint as indicated in Eclipse by a green line in the main.c source file. Note: By default a breakpoint is set at the start of main within the debug configuration profile, but this can be turned off. Also there is a bug in Eclipse OpenOCD & GDB plugin. When disabling the "Set breakpoint at: main" doesn't work, i.e. checkbox is unticked but it still breaks on main, you need to select "Remove all breakpoints" from the Run menu. I think this setting creates an invisible breakpoint in main, which is not synched (a round dot not shown) in the IDE source editor Noticed the layout, panels and toolbars have changed, Eclipse has switched into the debug perspective. Perspective is Eclipse's jargon for layout profile At the top the toolbar contains useful debug controls: resume, suspend, terminate, step into (F5) and step over (F6). Click the resume button to continue the execution. |
|
| 4.5. Debugging with semihosting | |
|---|---|
|
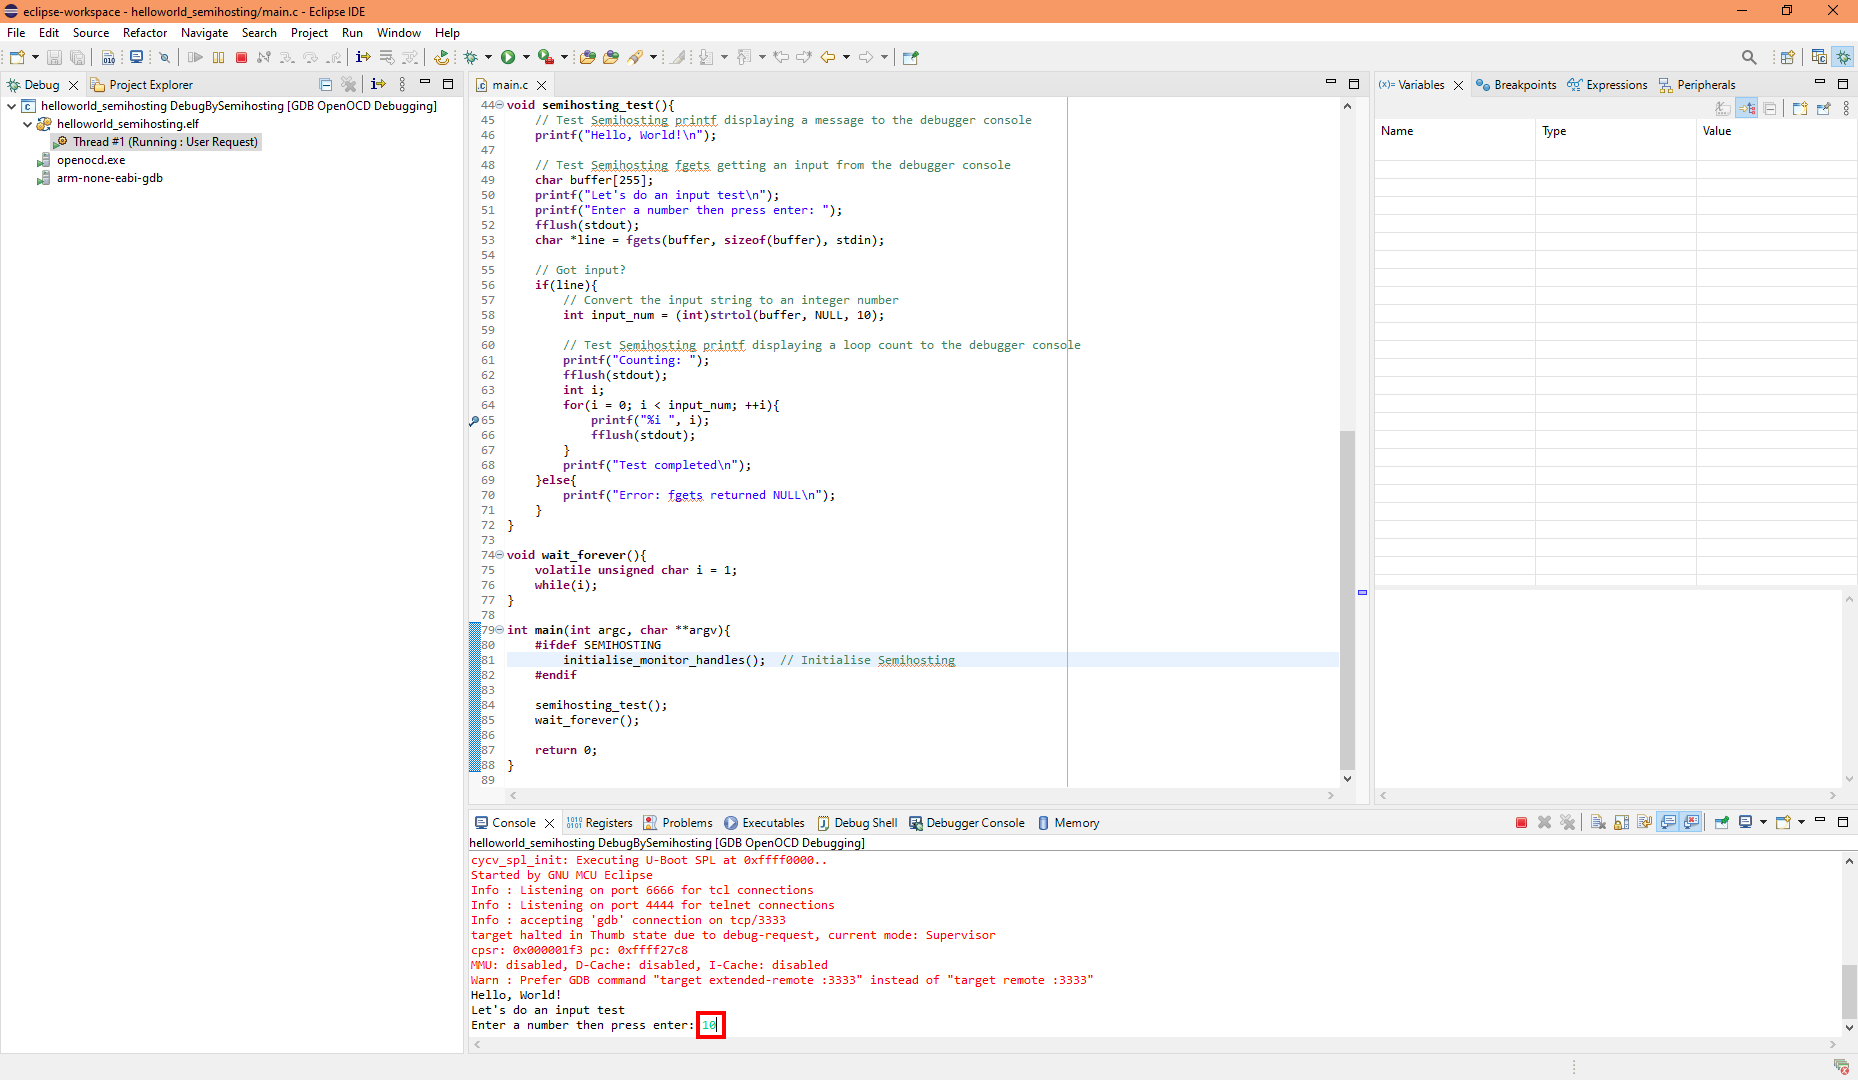
Semihosting is a mechanism which allows us to view and input debug messages through the debug adapter and a console. Eclipse conveniently includes a built-in console panel at the bottom. You should be able to see "Hello, World" as a debug message inside the console panel. This comes directly from the elf running on the DE10-Nano. Execution should be prompting for an input. Click inside the console panel and enter a number, for example 10, then press enter. |
|
| 4.6. Step the code | |
|---|---|
|
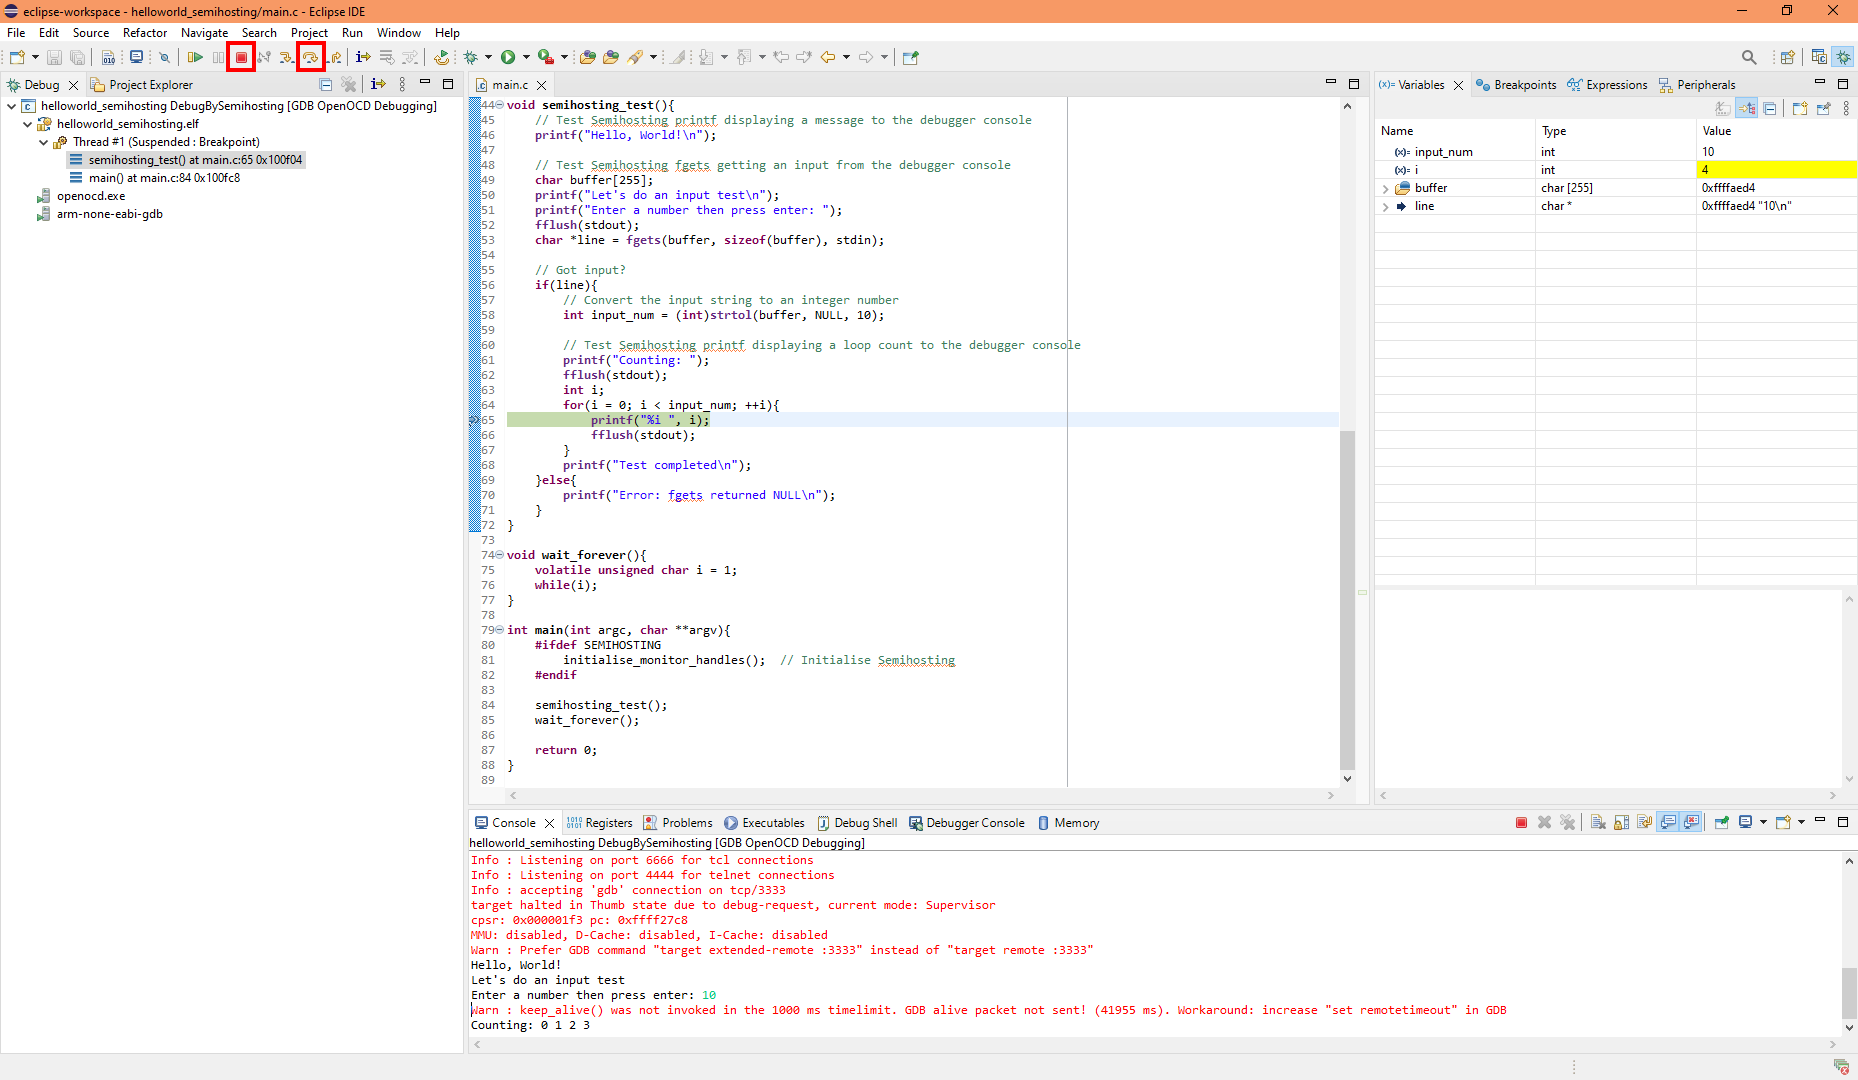
The execution should reach our breakpoint we made earlier and is now halted. We will use the toolbar at the top to step each line of the for loop. Click on the "step over" button (or press F6) to advance a step. Keep stepping and notice the console at the bottom outputs the for loop count sequence. Also, the variables panel displays a table of variables with their live content, these are read automatically from the target Arm processor on DE10-Nano via GDB & OpenOCD through the USB Blaster II (JTAG) adapter. Keep stepping, until you see "Test completed" message. Stepping any further will get you into the infinity loop function. |
|
| 4.7. Stop the debug session and switch back to the C/C++ perspective | |
|---|---|
|
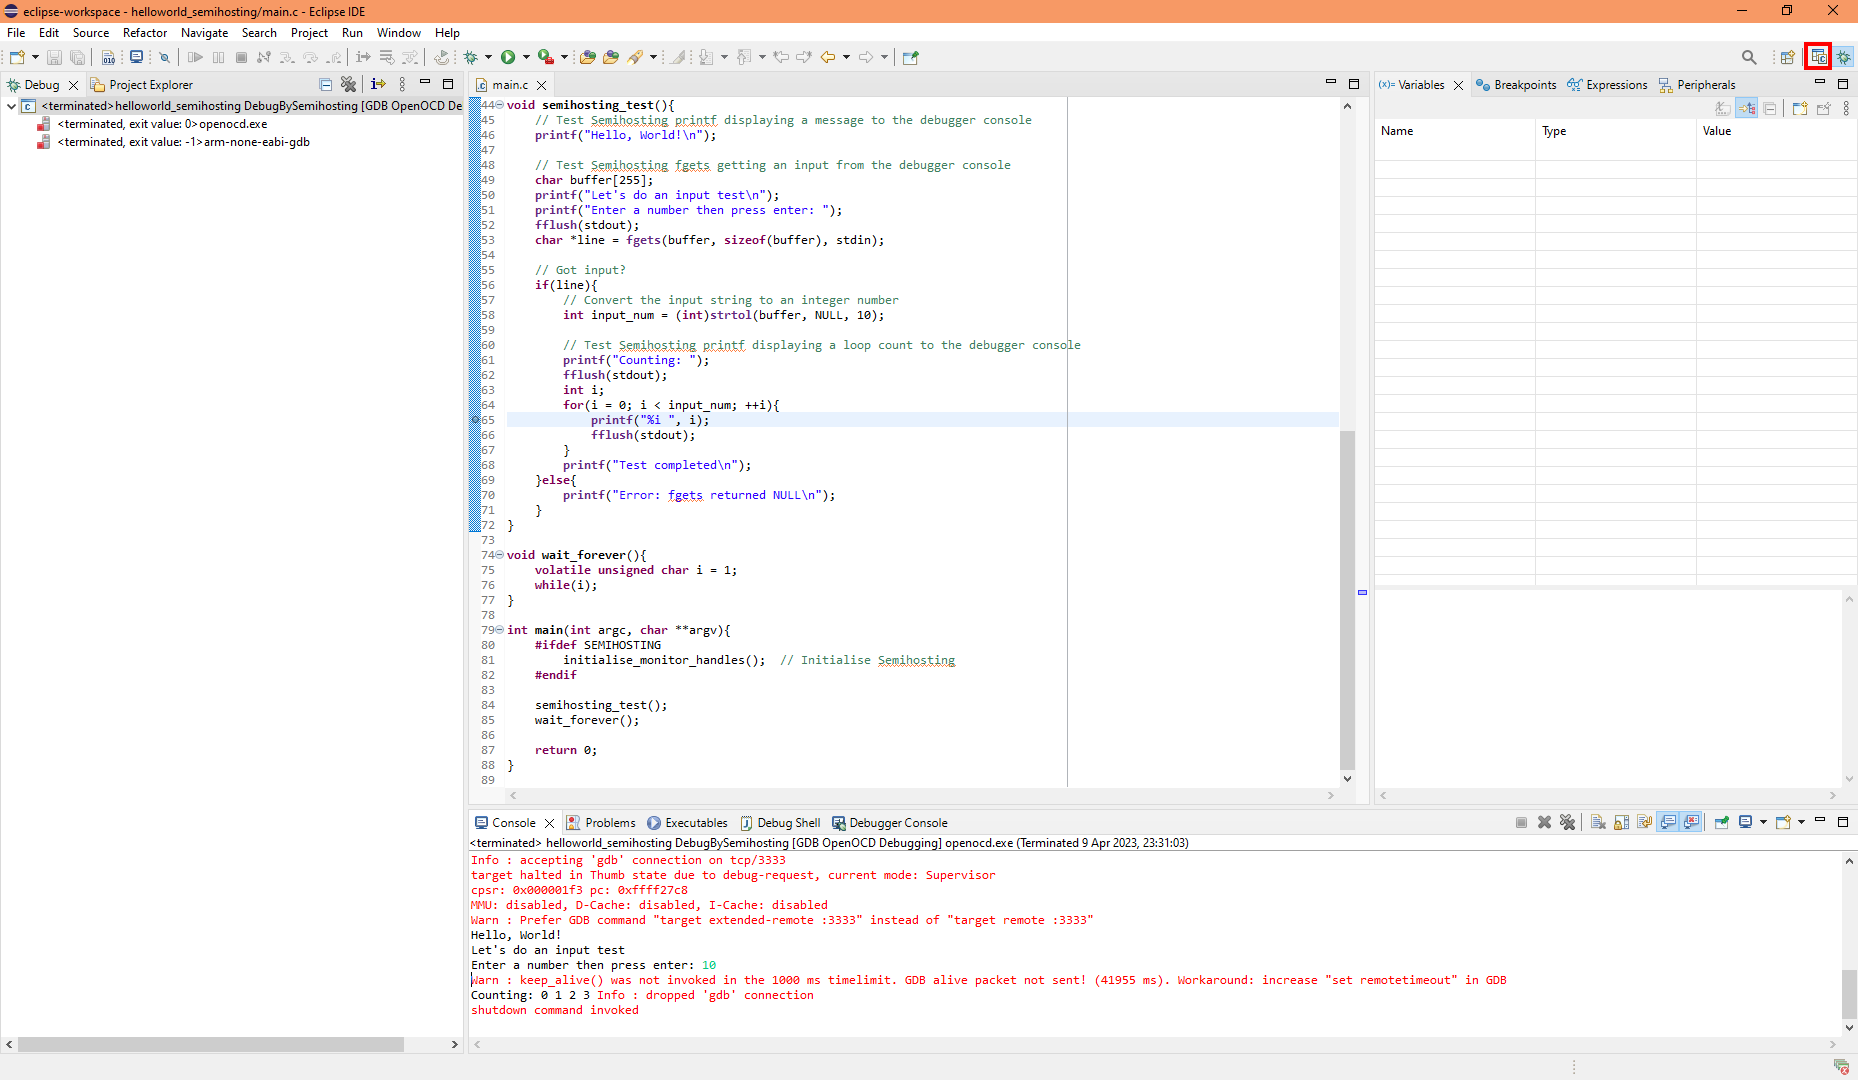
Click the red button in the toolbar at the top, this terminates the debug session and also stops the debug connection (OpenOCD and GDB) between the USB Blaster II and Eclipse. The layout is not automatically restored, click the C/C++ perspective button on the top right corner (see the picture). This restores the layout back to the C/C++ perspective. Note, although the debug session has stopped, the execution continues to run on the DE10-Nano's processor. *Update*, in newer Eclipse GDB/OpenOCD it now halts the execution when session is stopped. But this is not an issue because my OpenOCD script sends a soft processor reset when another debug session is started. |
|
5. The "Hello, World" source files
I've tried to keep the example source code to the minimum.
| File | Description |
|---|---|
| main.c | The main source file. |
| hello_world_semihosting_debug.launch | Debug configuration with GDB and OpenOCD debug settings. This can be used to launch a debugging session for the currently selected (active) build configuration. |
| u-boot-spl-nocache | Compiled U-Boot SPL elf file. It is built with embedded SPL device tree, hardware watchdog timer disabled, L1 I-cache and D-cache disabled and bridges enabled. |
| util/newlib_ext.h/.c, c5_util.h, c5_uart.h/.c | Contains functions for newlib stubs and my lowlevel functions for Cyclone V SoC. |
| hwlib_minimum/alt_base.c | Stock low level startup source file from HWLib. |
| hwlib_minimum/cvav-ddr.ld | Stock linker file from HWLib. A Cyclone V and Arria V linker file for running from DDR-3 SDRAM. |
6. Creating a new project
In this step we will create and setup a completely new C project. We make it work with the HWLib library and to save time we will use some of the files from my second example "Hello, World!" hwlib.
Download from here: helloworld_hwlib_20251212.zip
| 6.1. Create a new project | |
|---|---|
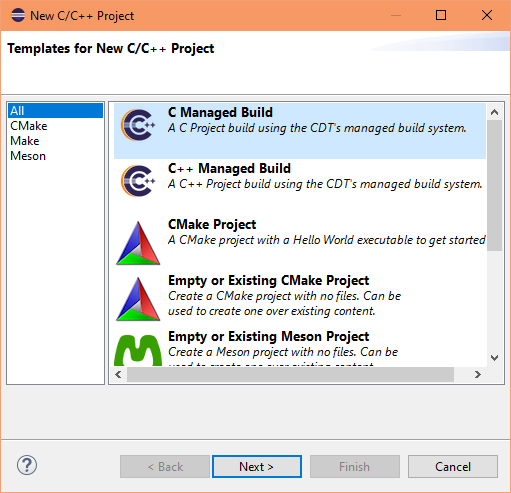
In Eclipse:
|
|
| 6.2. Set project details | |
|---|---|
Steps:
|
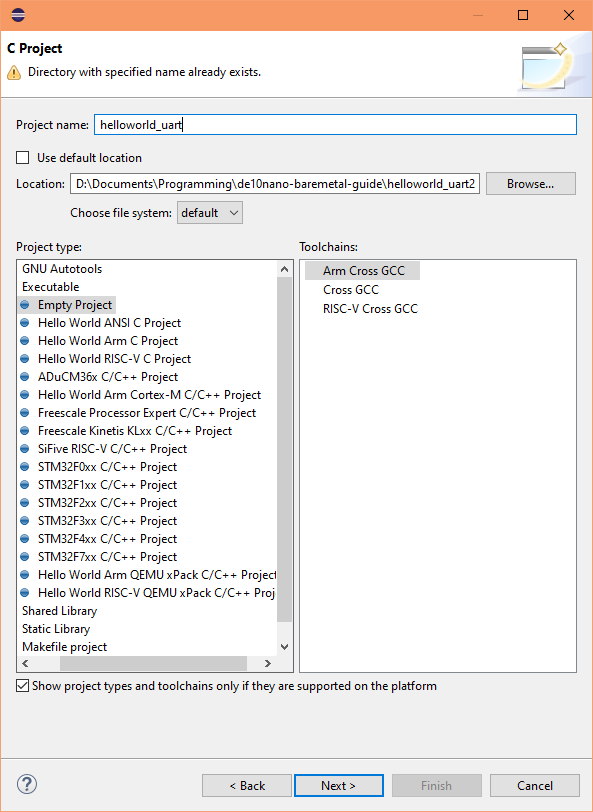
|
| 6.3. Set project toolchain | |
|---|---|
Steps:
|
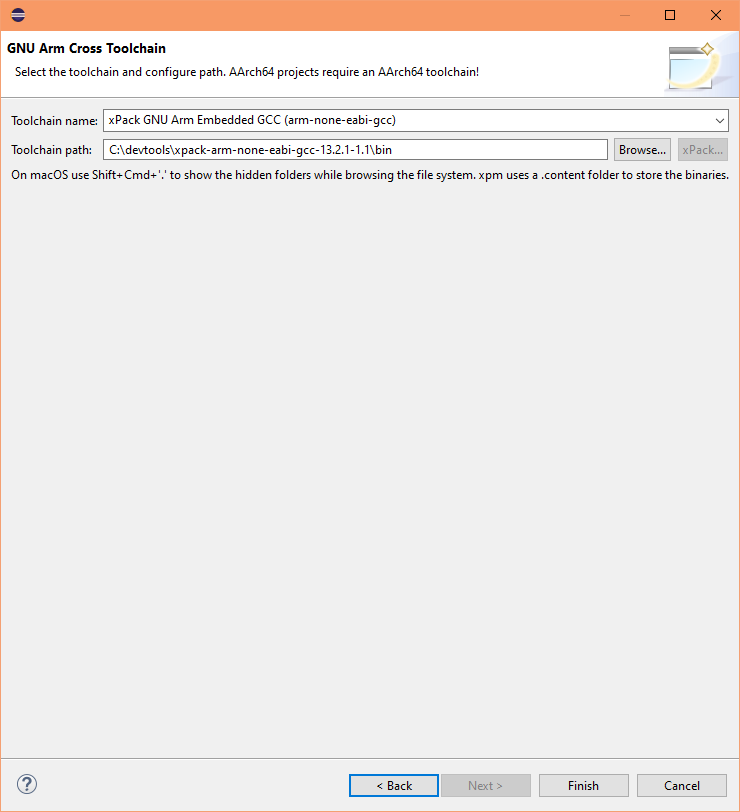
|
| 6.4. Add files to the project | |
|---|---|
|
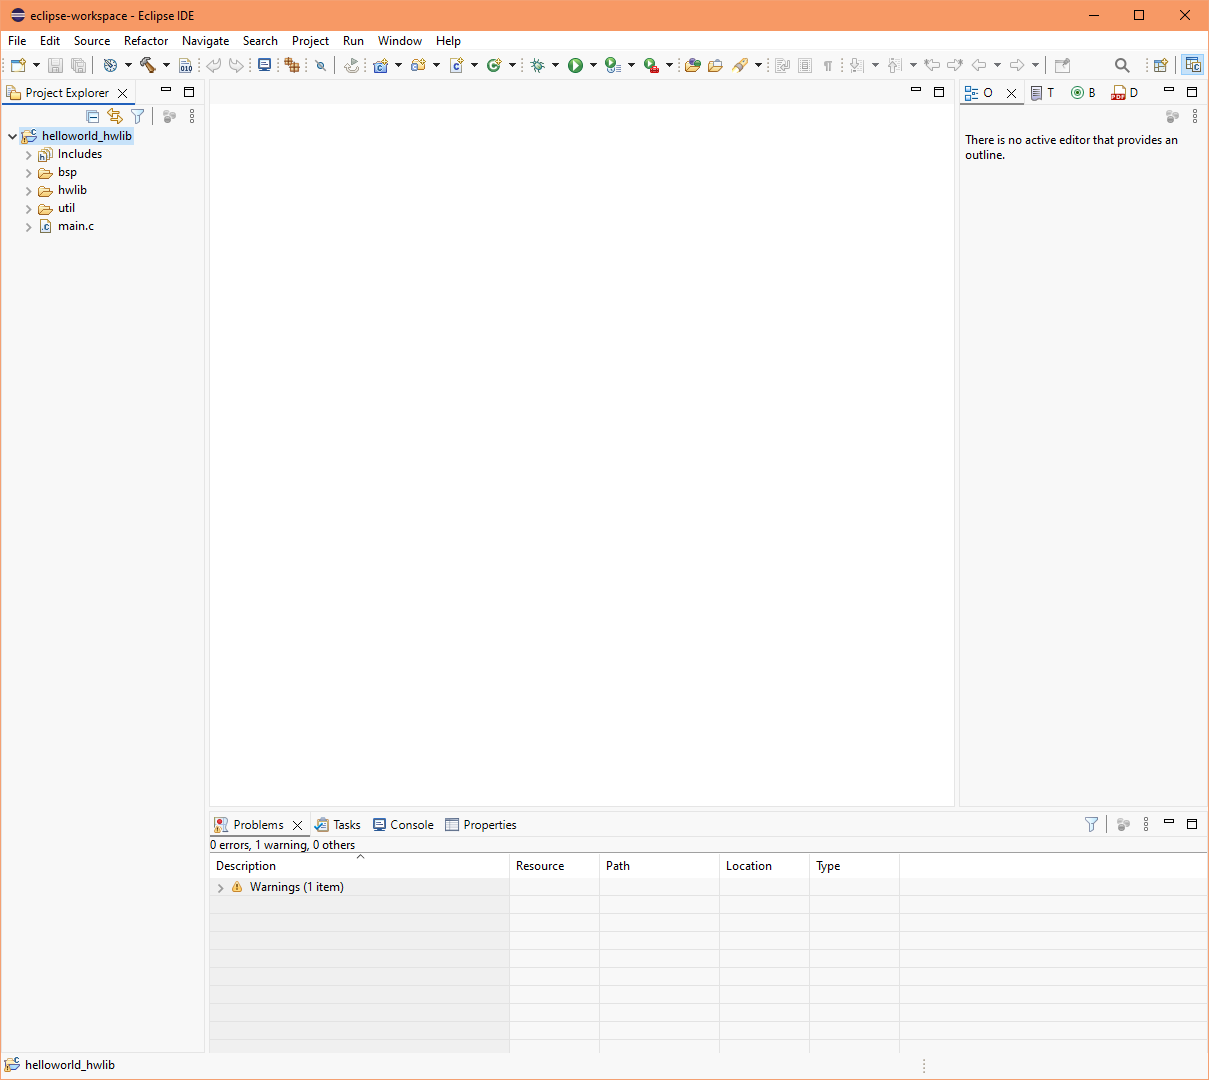
We cannot do much with an empty project, let's add in some files from the "Hello, World!" hwlib example. Minimise Eclipse, and use File Explorer or a suitable program to extract the following files into your project folder (helloworld_hwlib_20251212):
Maximise Eclipse, then within Project Explorer, open up the tree, right-click the project name and select "Refresh" (or press F5) Note, if you prefer to download the HWLib source from the official site, get it from here and replace the hwlib folder: Intel SoC FPGA HWLib. You will need the hwlib located inside the armv7a folder. |


|
7. Configuring project build settings
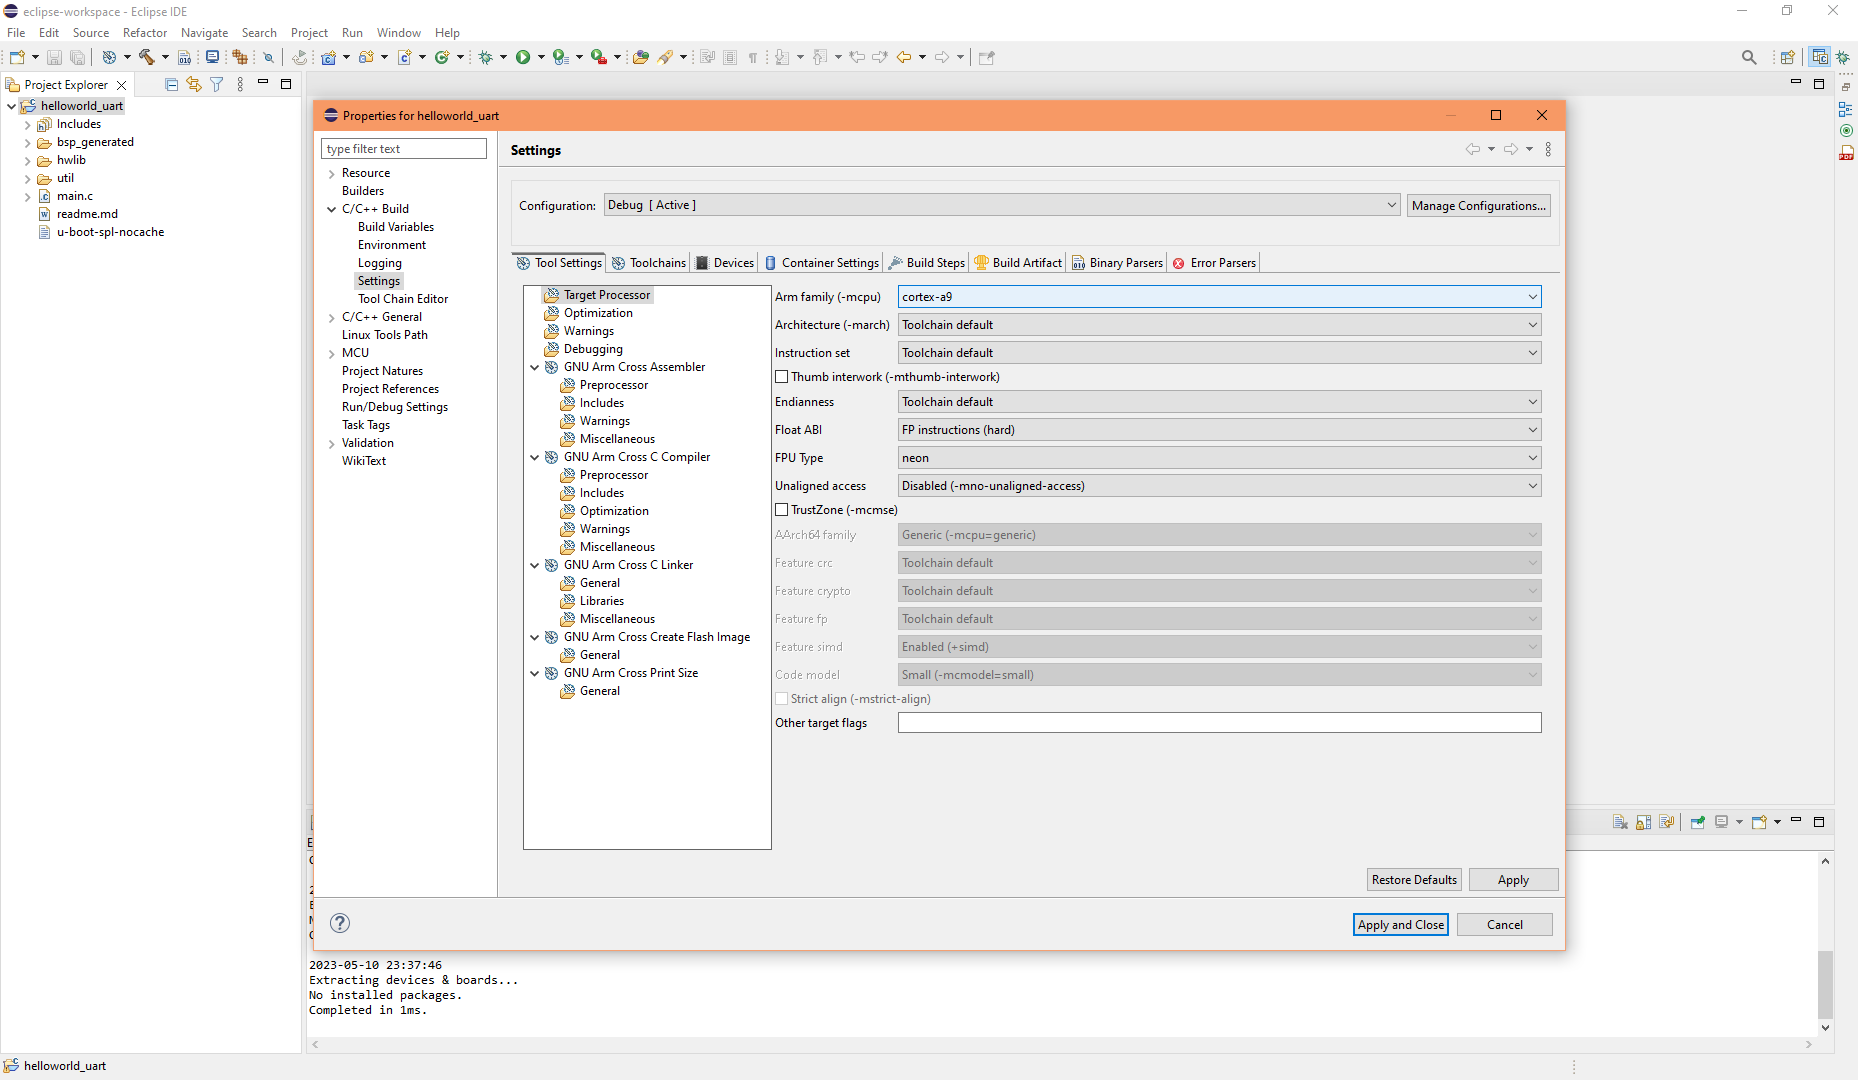
| 7.1. Configure target processor for Debug build configuration | |
|---|---|
|
The project cannot be compiled yet, it needs the correct build settings. Steps:
|
|
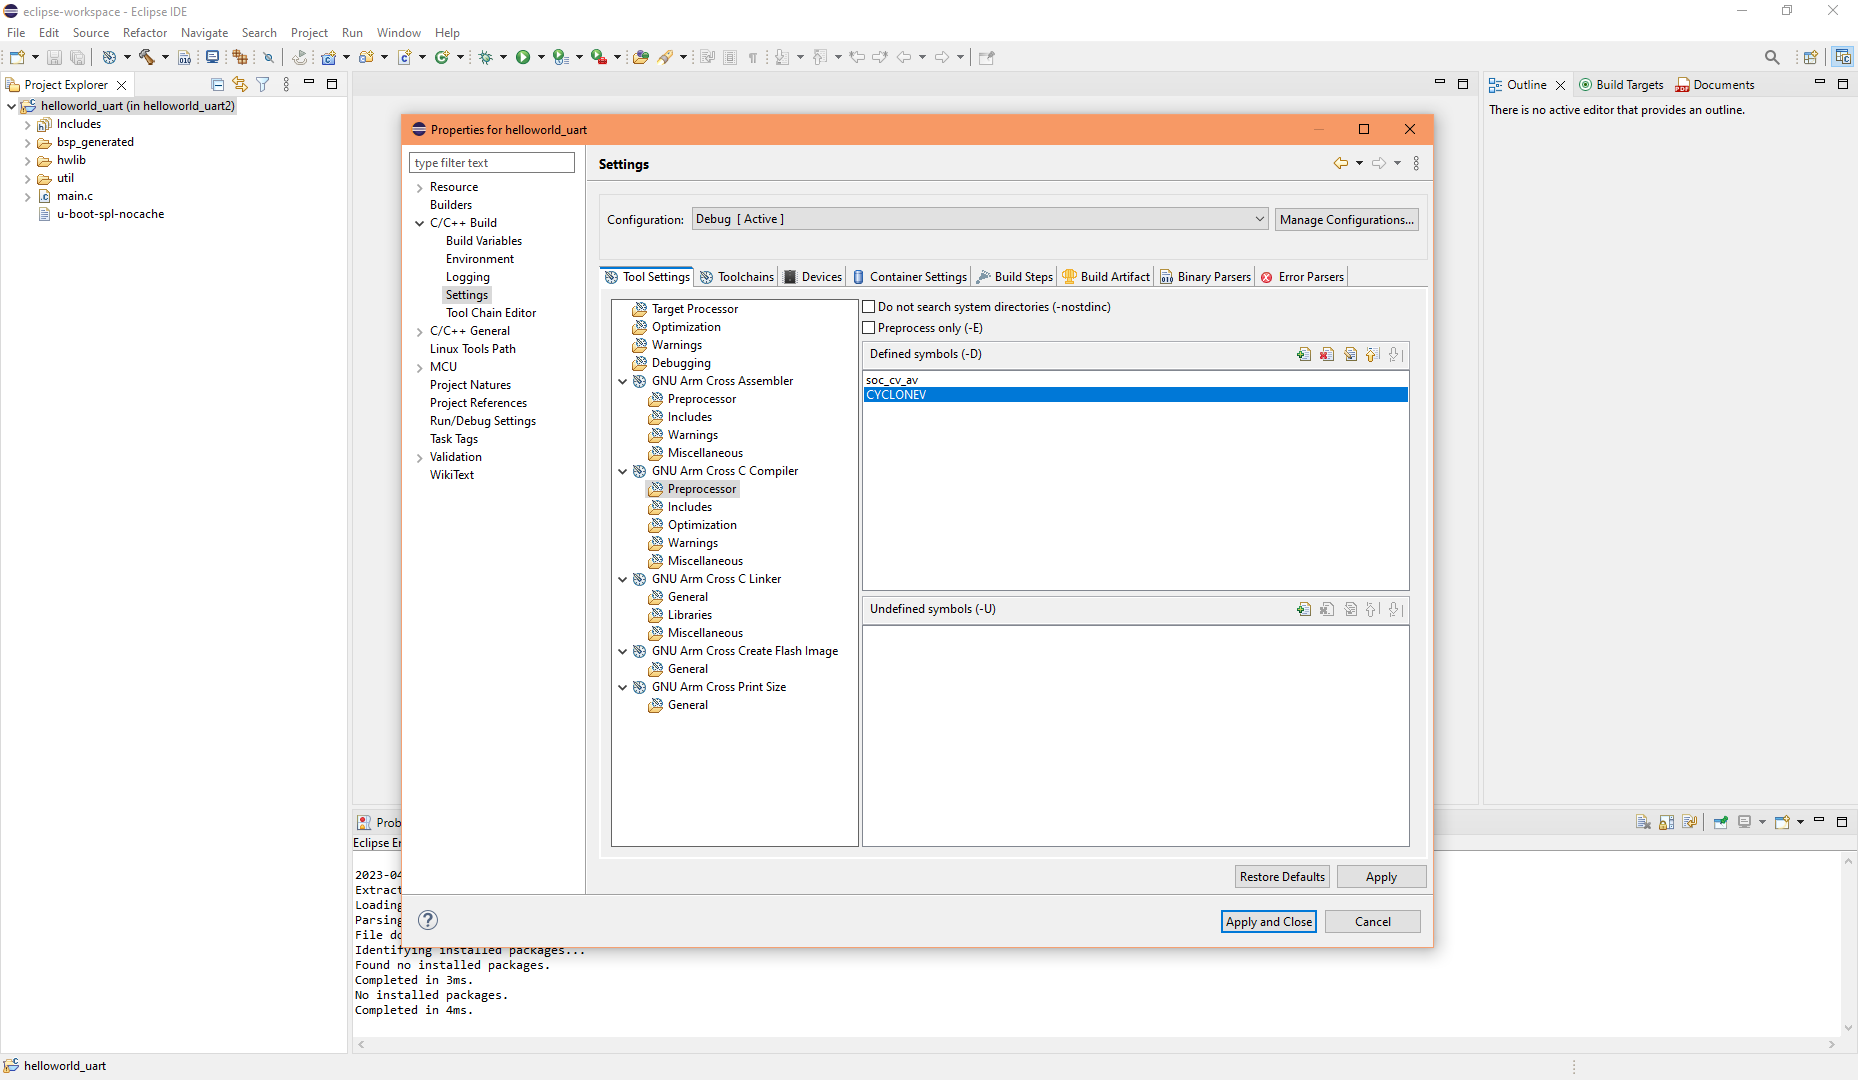
| 7.2. Configure user defines (symbols) for Debug build configuration | |
|---|---|
|
HWLib needs these defined symbols set when using a Cyclone V SoC-FPGA. Steps:
|
|
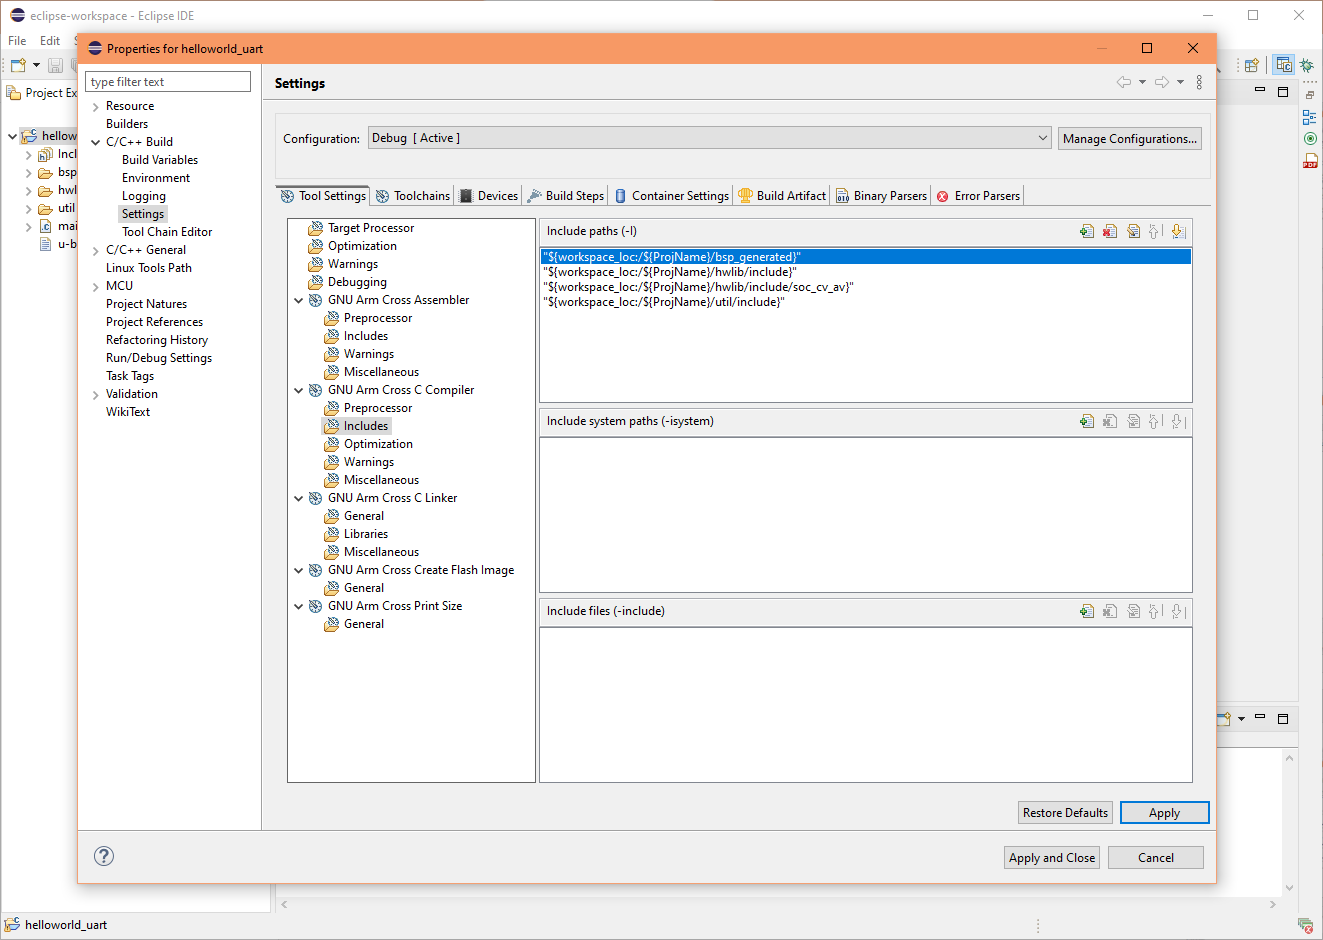
| 7.3. Configure include paths for Debug build configuration | |
|---|---|
|
In my source files, the header includes don't use absolute paths so we need set the search paths here to tell it where to look for header files during a build. Steps:
|
|
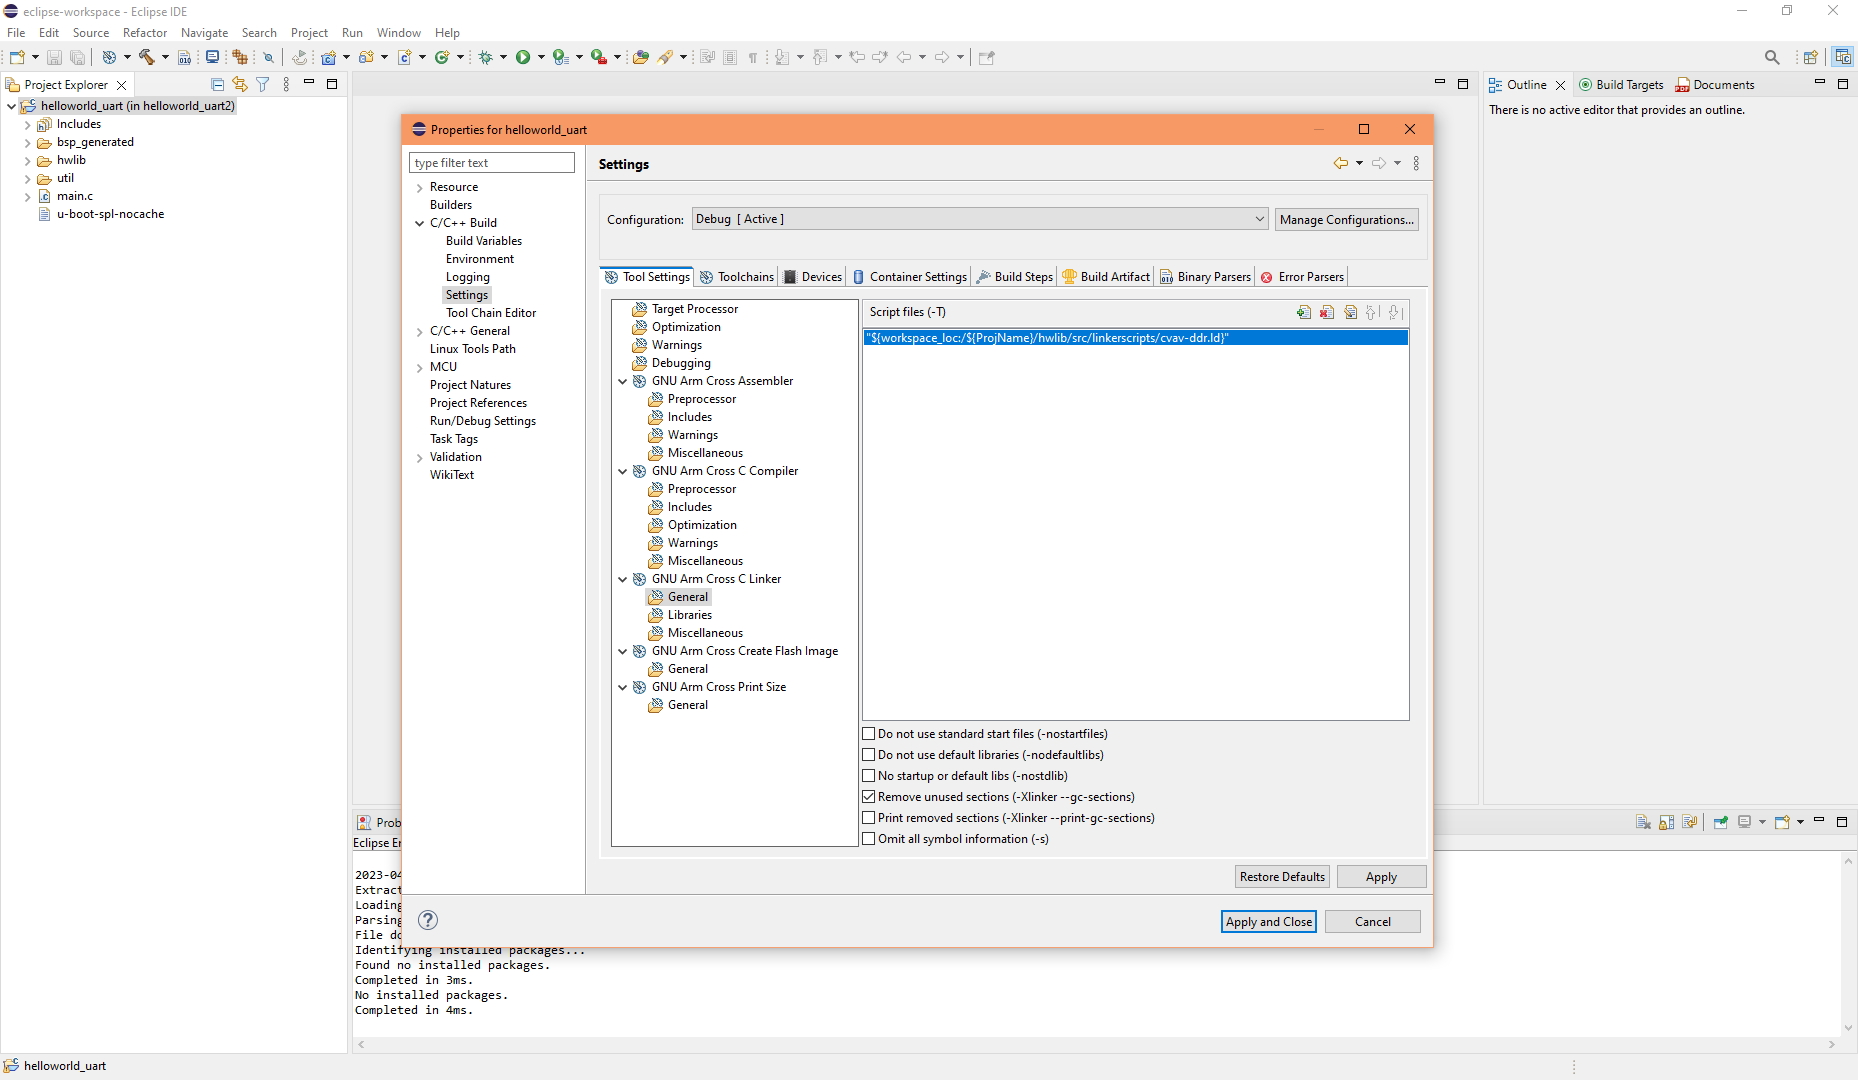
| 7.4. Configure linker script for Debug build configuration | |
|---|---|
|
Bare-metal require a suitable linker script for your board and processor, we will use HWLib's linker file. Steps:
|
|
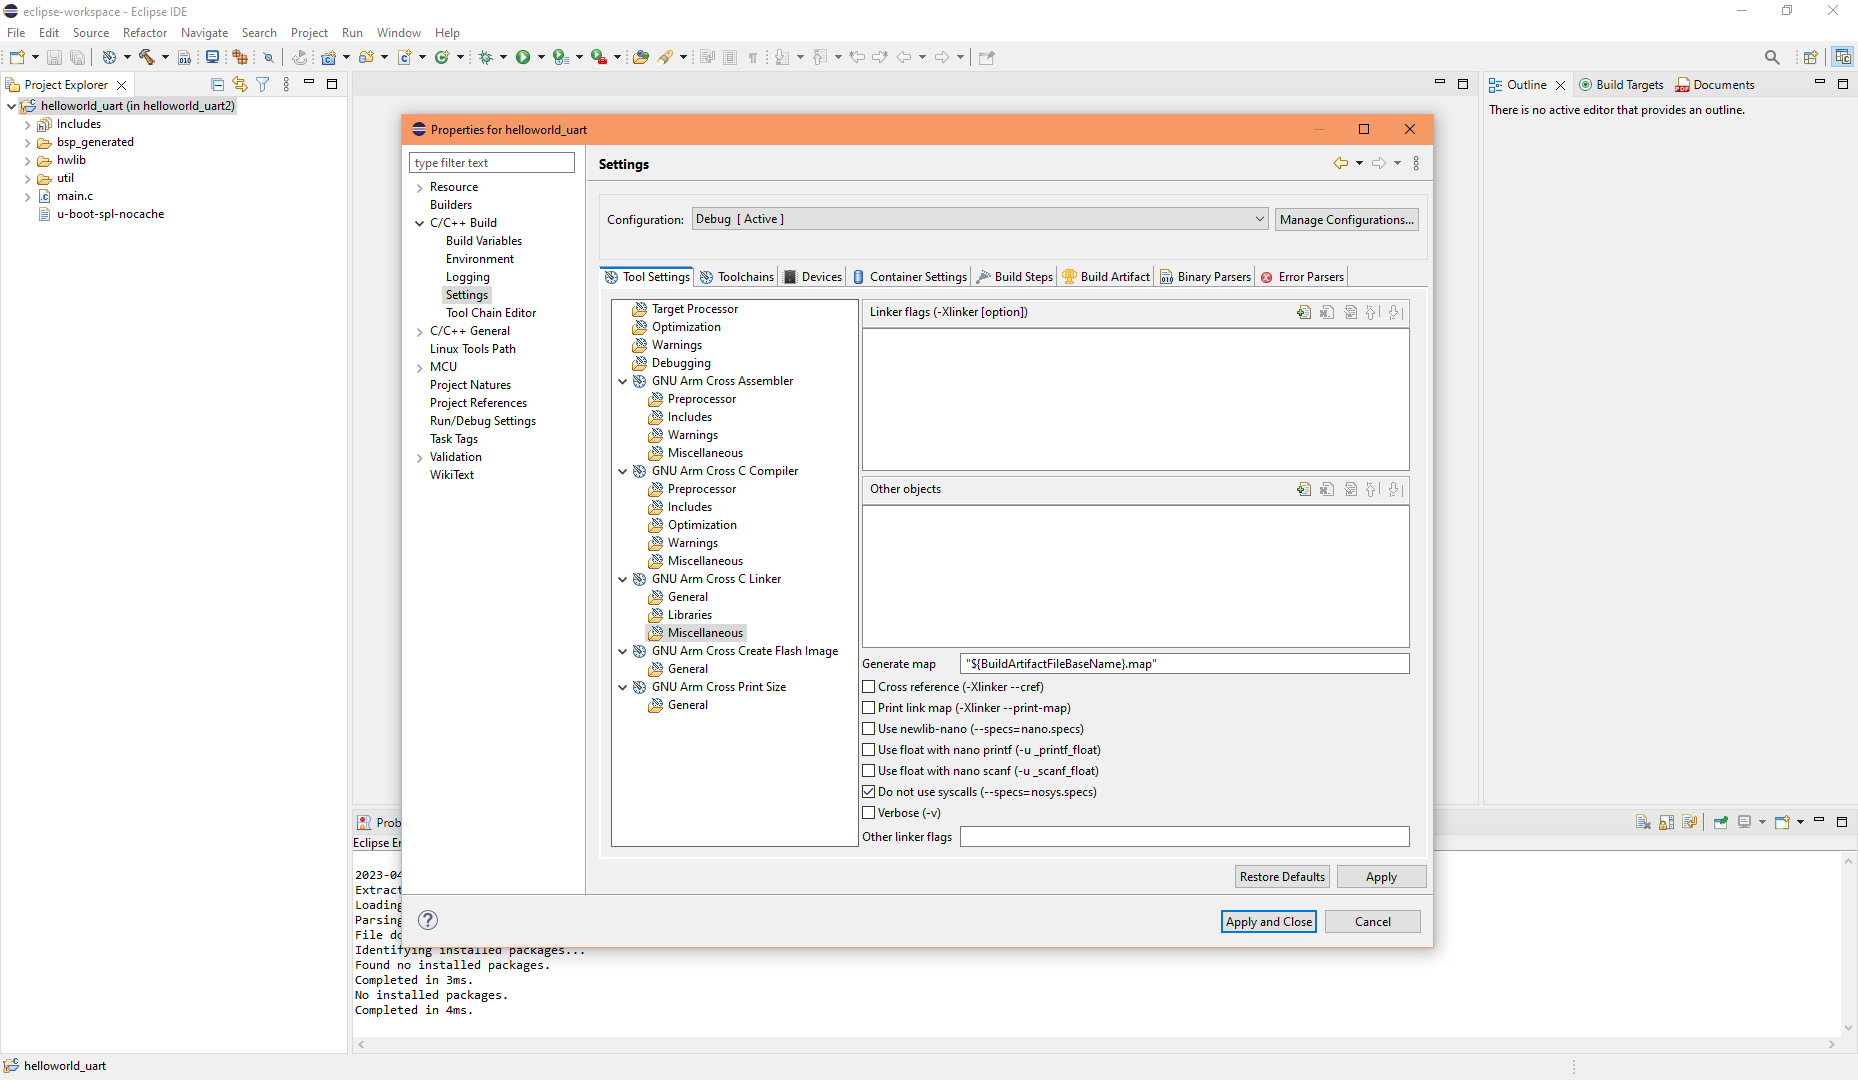
| 7.5. Configure linker miscellaneous for Debug build configuration | |
|---|---|
Steps:
|
|
| 7.6. Configure create flash image for Debug build configuration | |
|---|---|
|
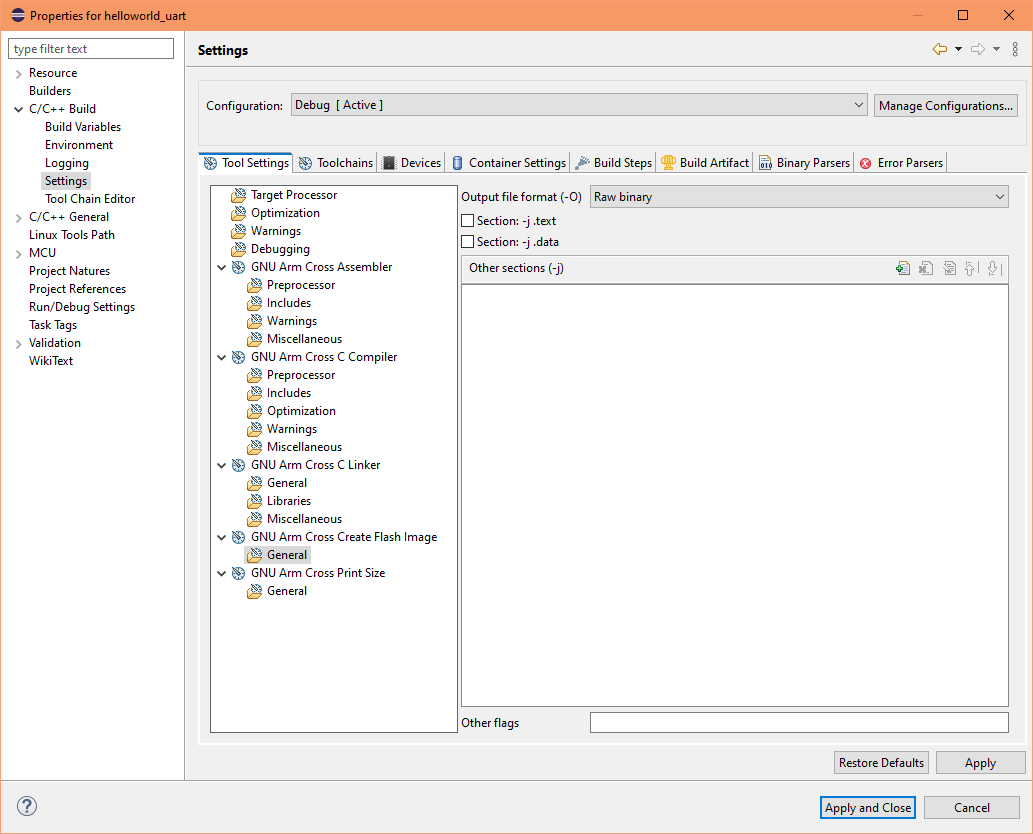
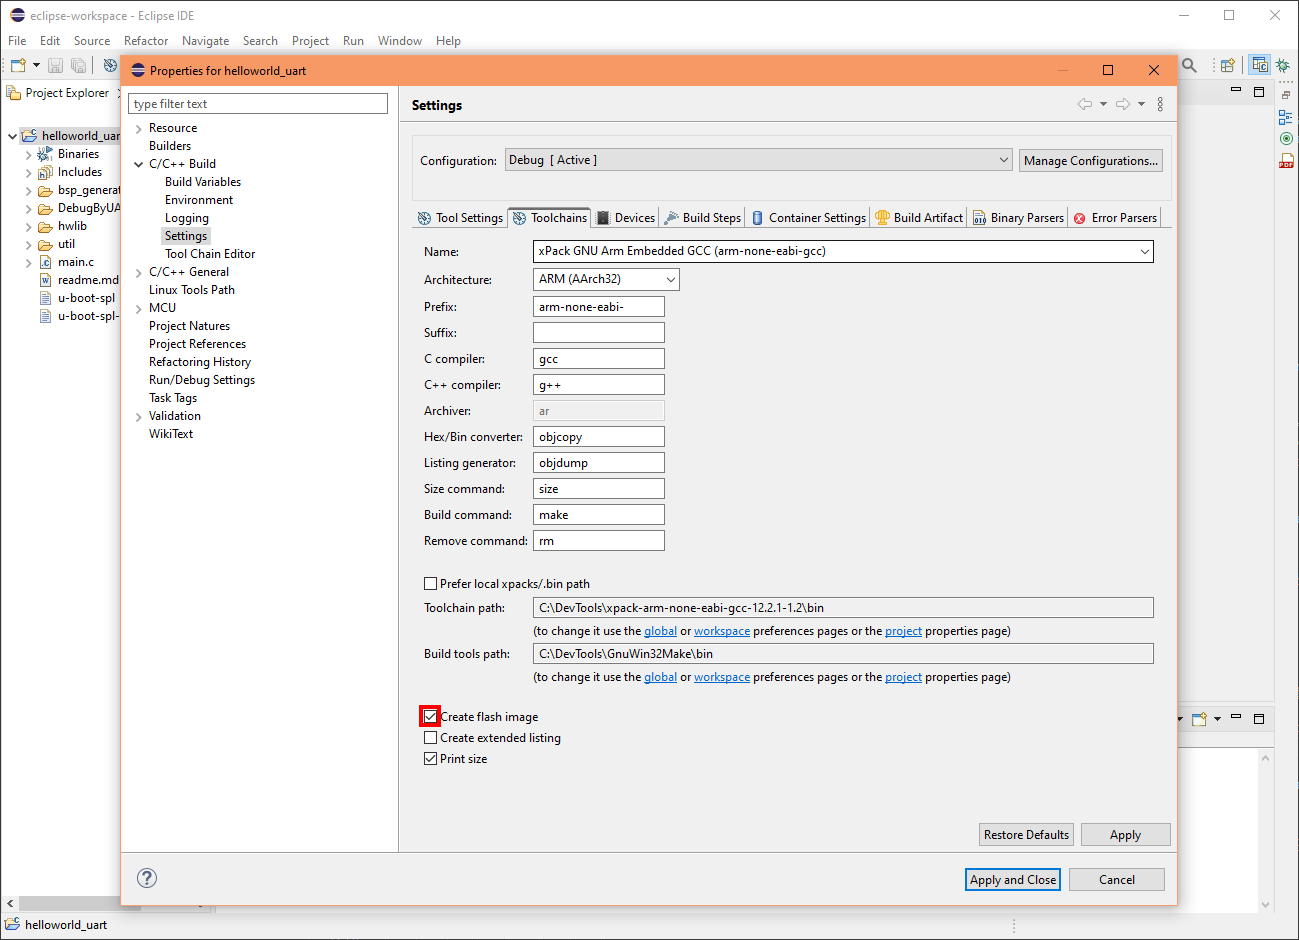
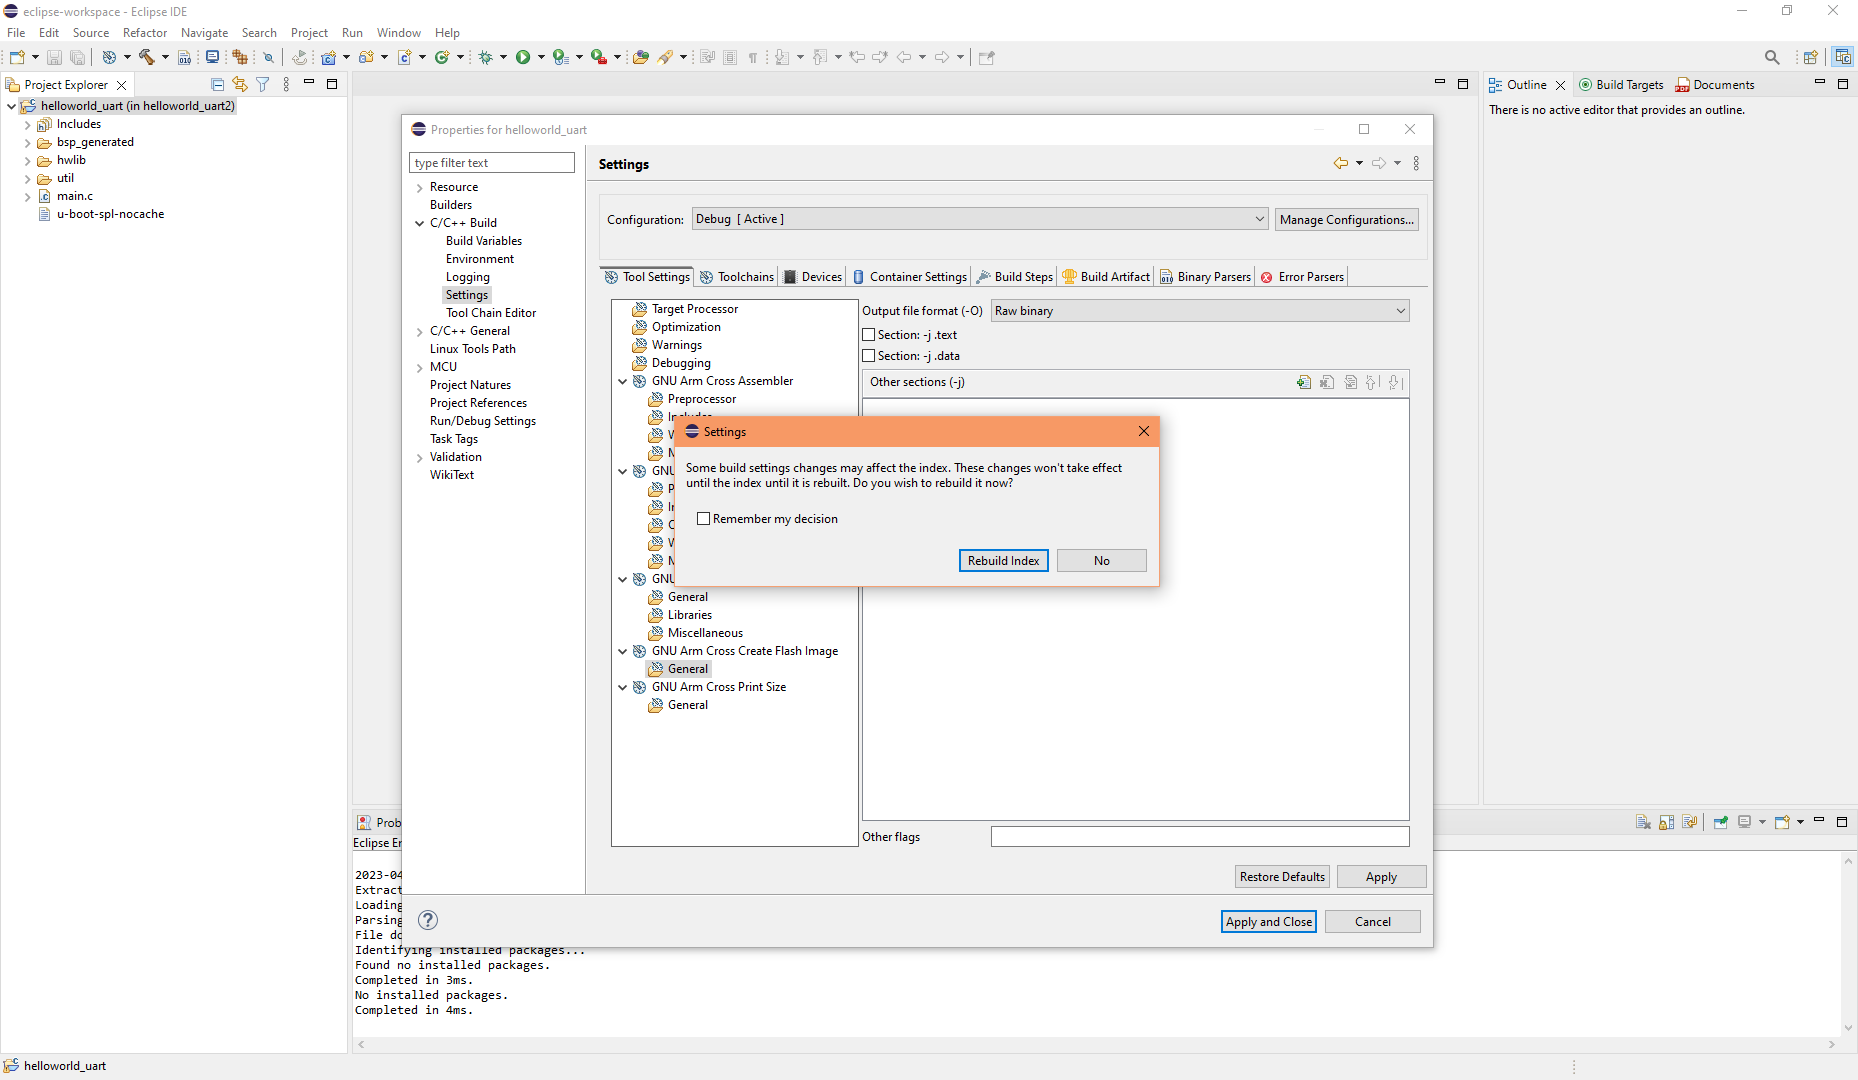
By default the "Create flash image" option is enabled with "Intel HEX" format. This option outputs an additional compiled file useful for creating images. It is not required now, but it will be required when creating a SD card image or a flash memory image, and this is because U-Boot-SPL does not support the .elf format, however it is able to load and start a binary file. We will leave it enabled, but let's change the output to the more suitable binary format instead:
|
|
| 7.7. Configure Release build configuration | |
|---|---|
|
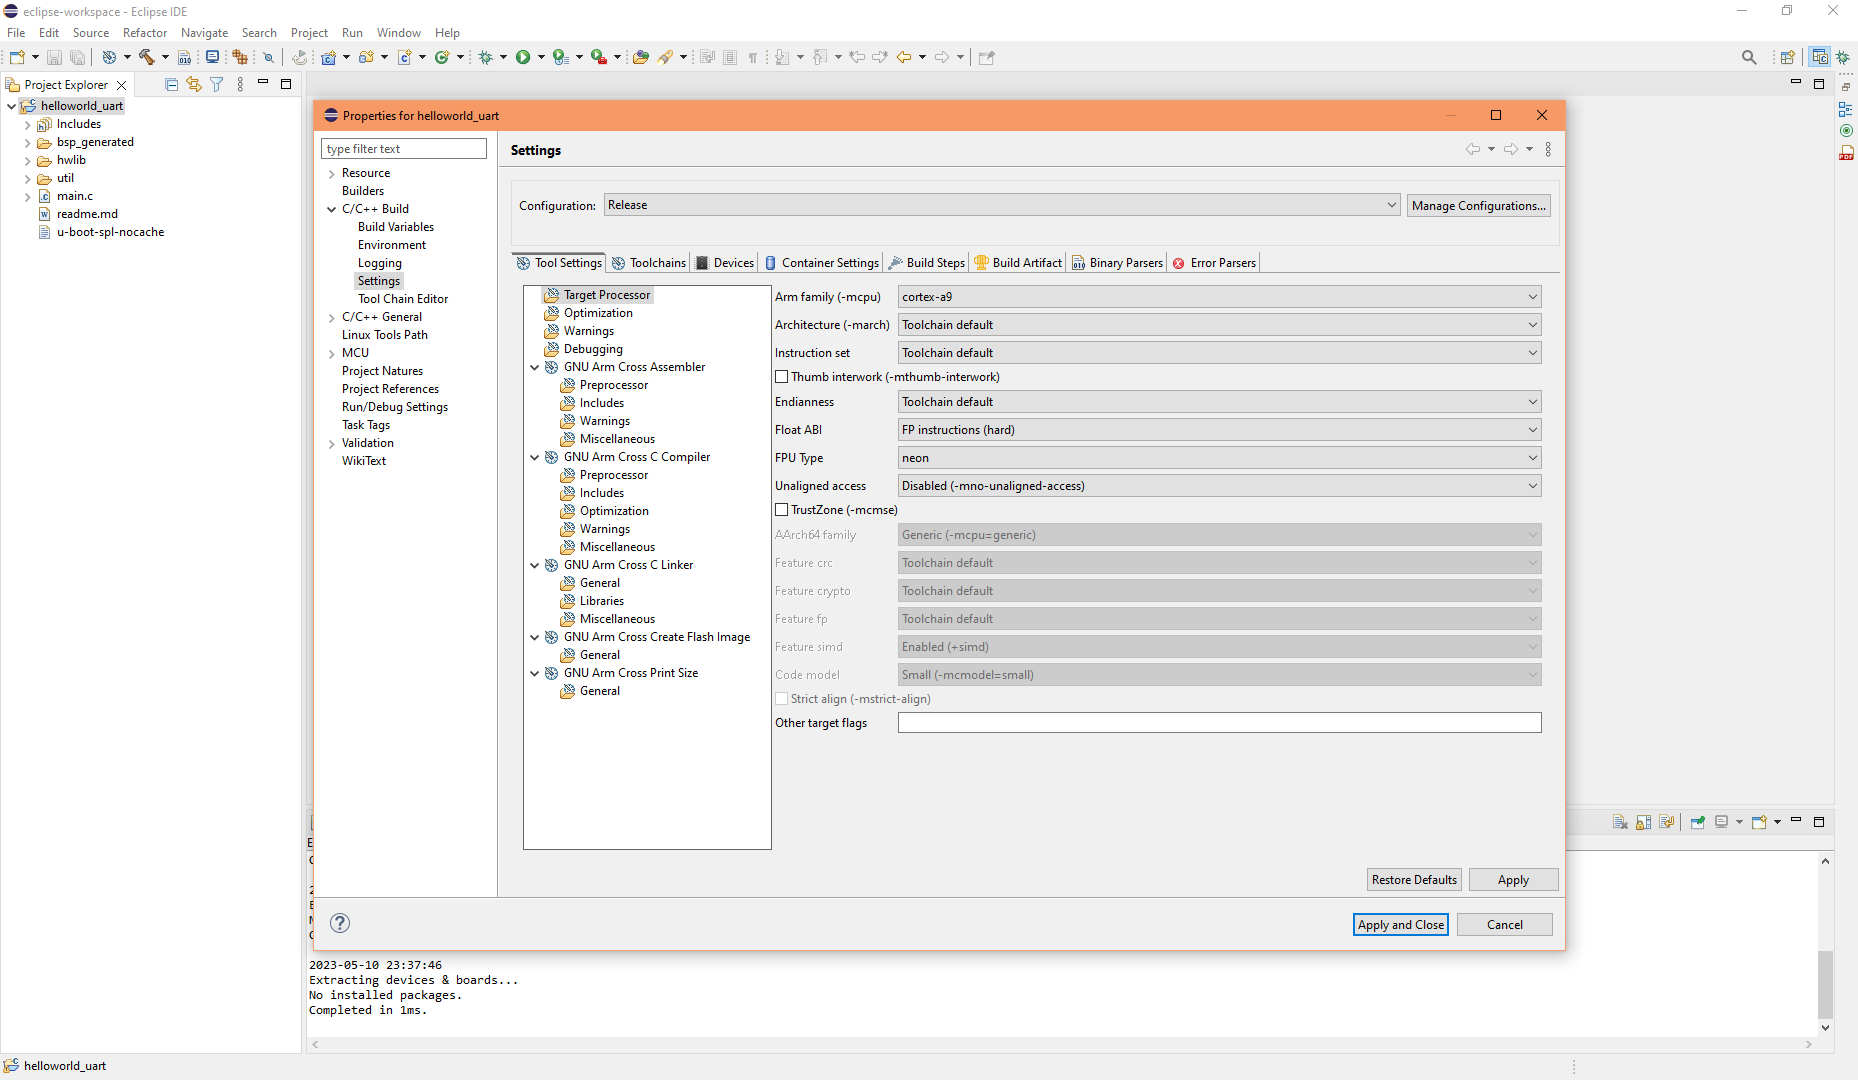
Ok, let's switch to the Release configuration. Using the dropdown at the top, switch to the Release. The Release configuration requires the same changes we made for the Debug configuration, unfortunately you have to manually repeat the process. We could have selected the "All configurations" at the beginning and then make our changes, but there is no indication (e.g. no colour coding or emphasis) to show which options are the same or different - I believe this is accident-prone for beginners. Note: Don't forget to click "Apply" at the end, and if prompted rebuild the index. |
|
| 7.8. Create a new build configuration for semihosting | |
|---|---|
|
If we want to use Semihosting debug functionality we need to set linker library settings. We can set them in the Debug configuration but I prefer to create a separate build configuration for it. We will copy the Debug configuration for the new semihosting configuration:
|
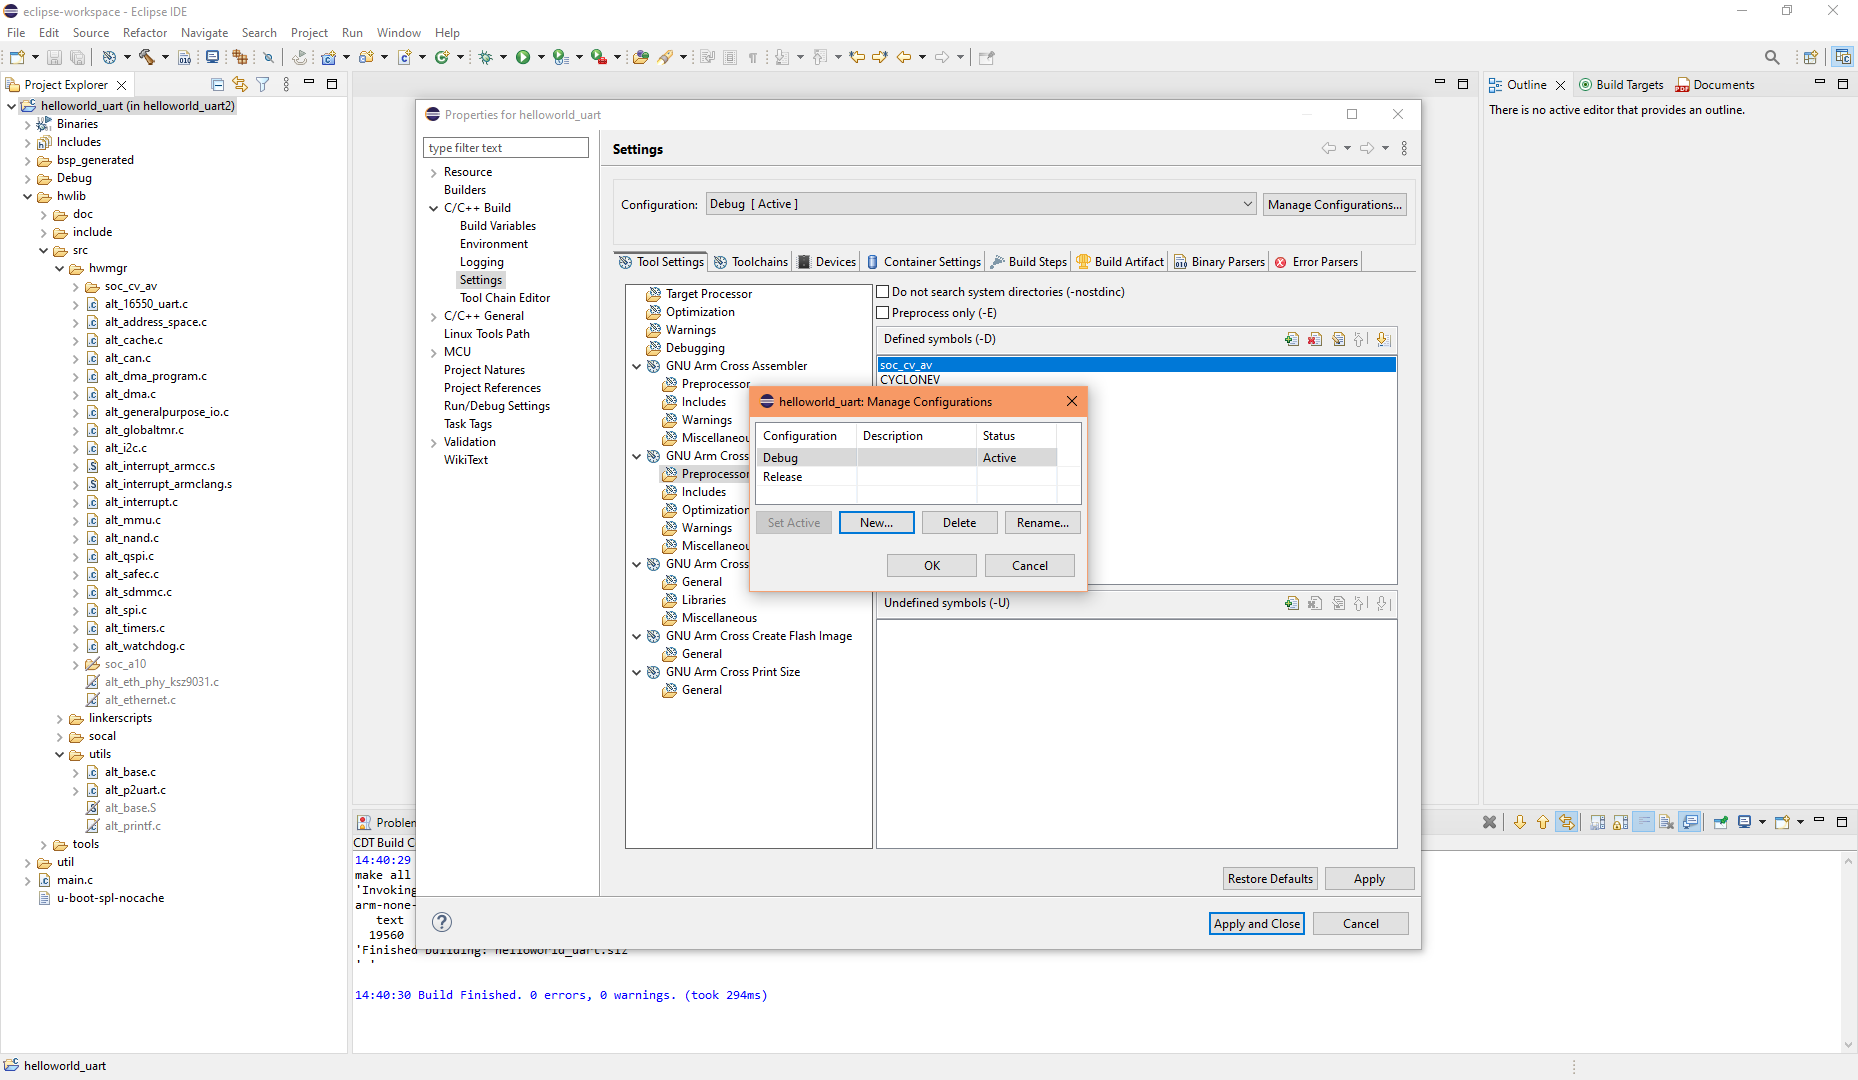
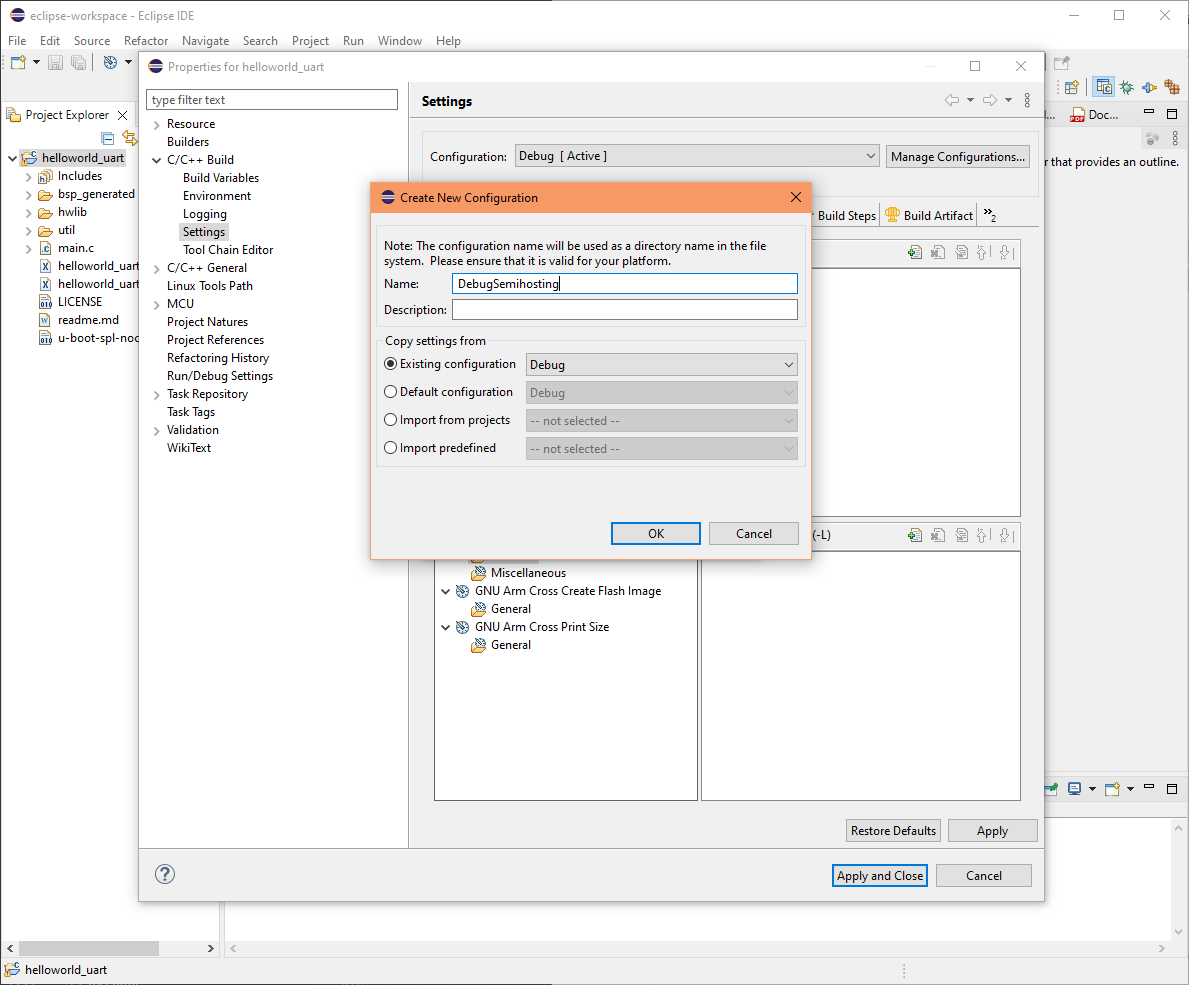
|
| 7.9. Configure user defines (symbols) for semihosting build configuration | |
|---|---|
|
We will add a user defined symbol (a made up symbol) for use in our code to conditionally enable and disable semihosting code. Steps:
|
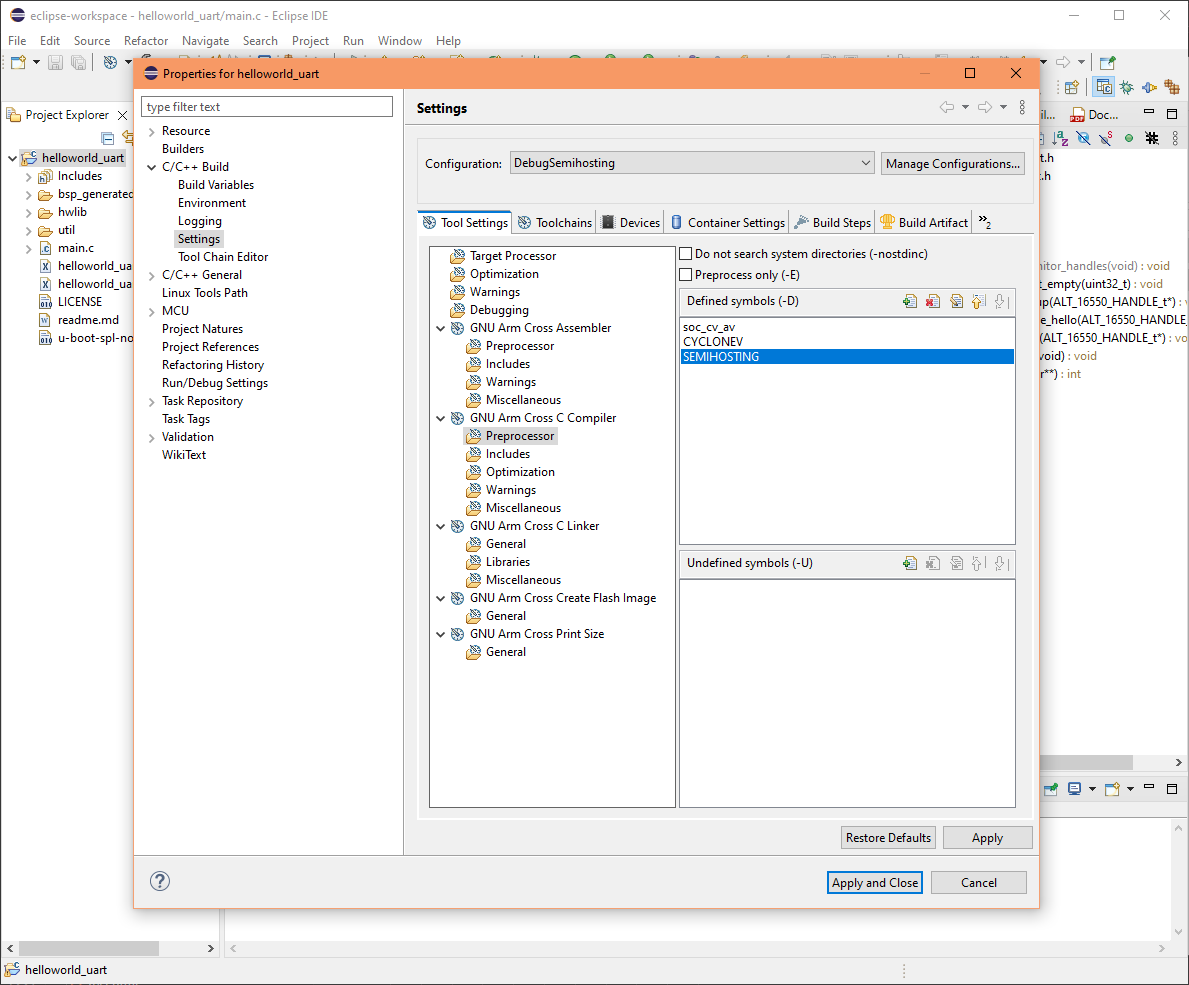
|
| 7.10. Configure linker library for semihosting build configuration | |
|---|---|
|
To use semihosting we need to link to the rdimon library and also set specs flag for rdimon. The rdimon library comes with the GNU C/C++ Arm cross toolchain we are using so no need to install anything. Steps:
|
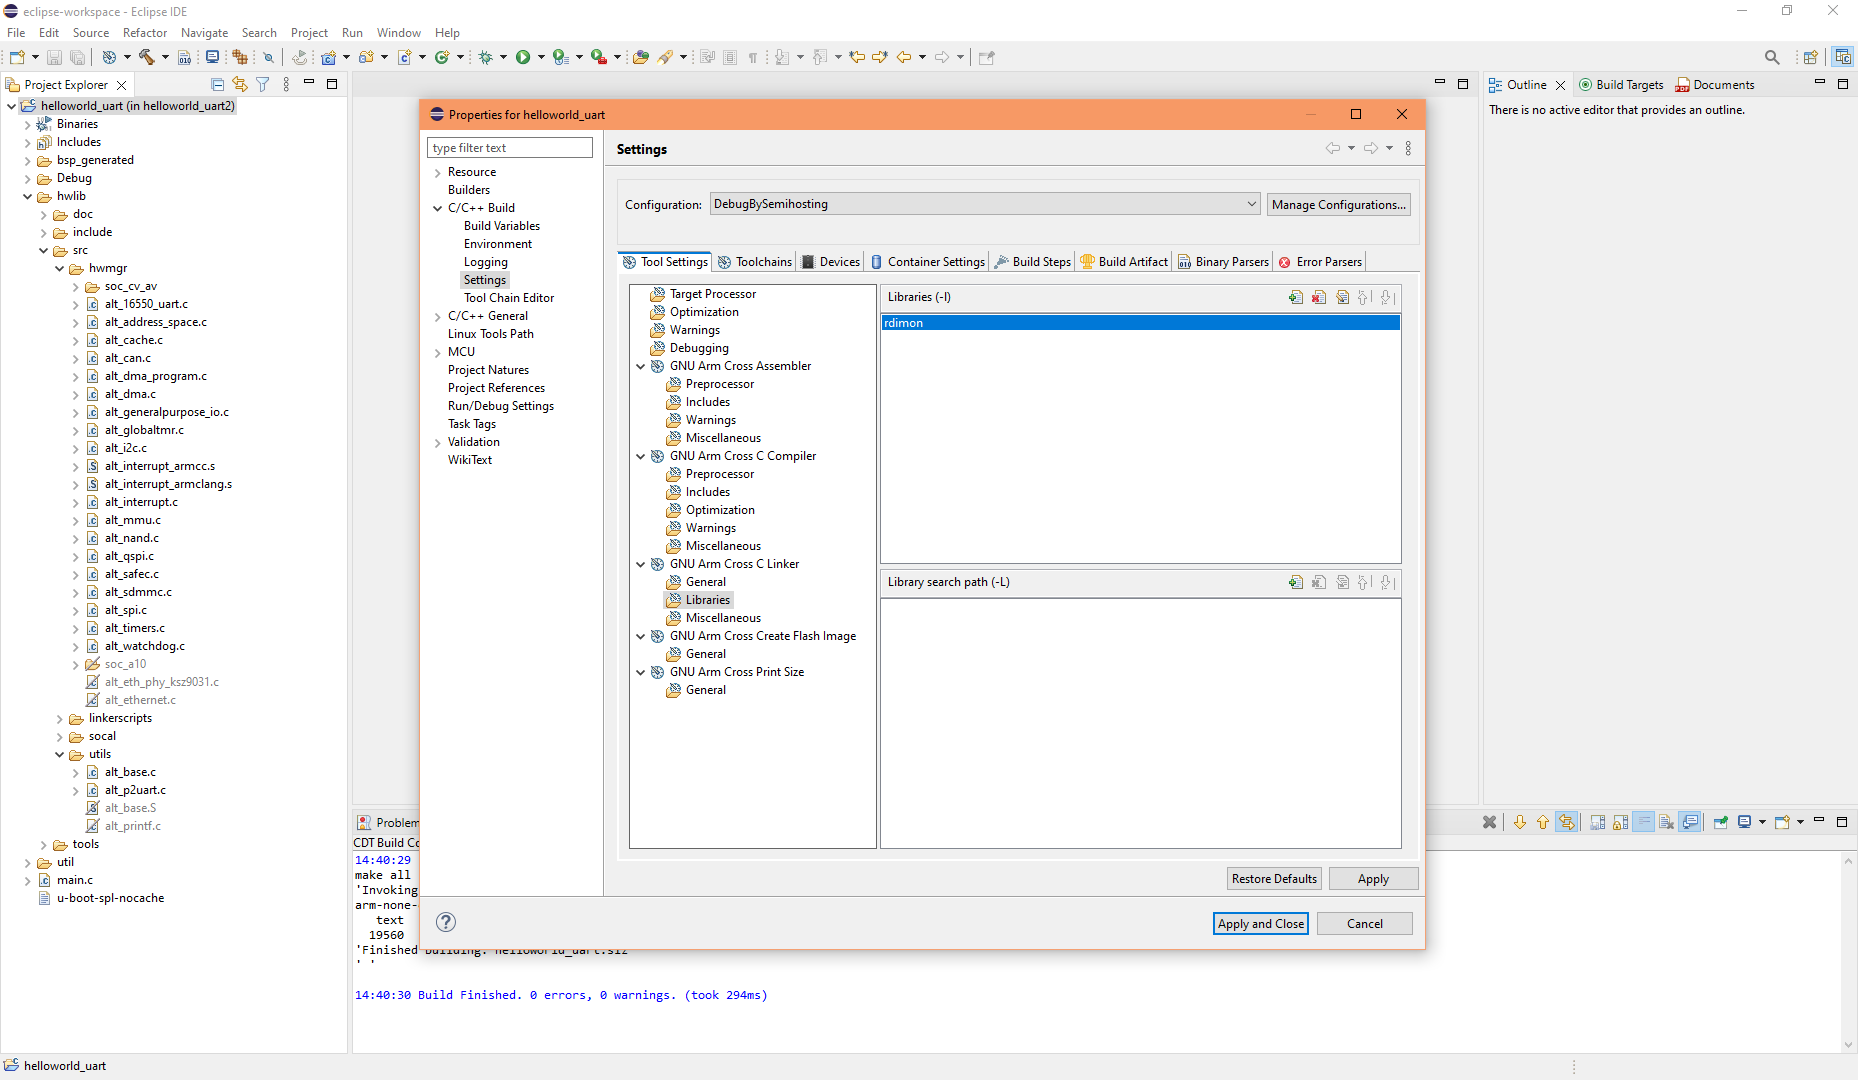
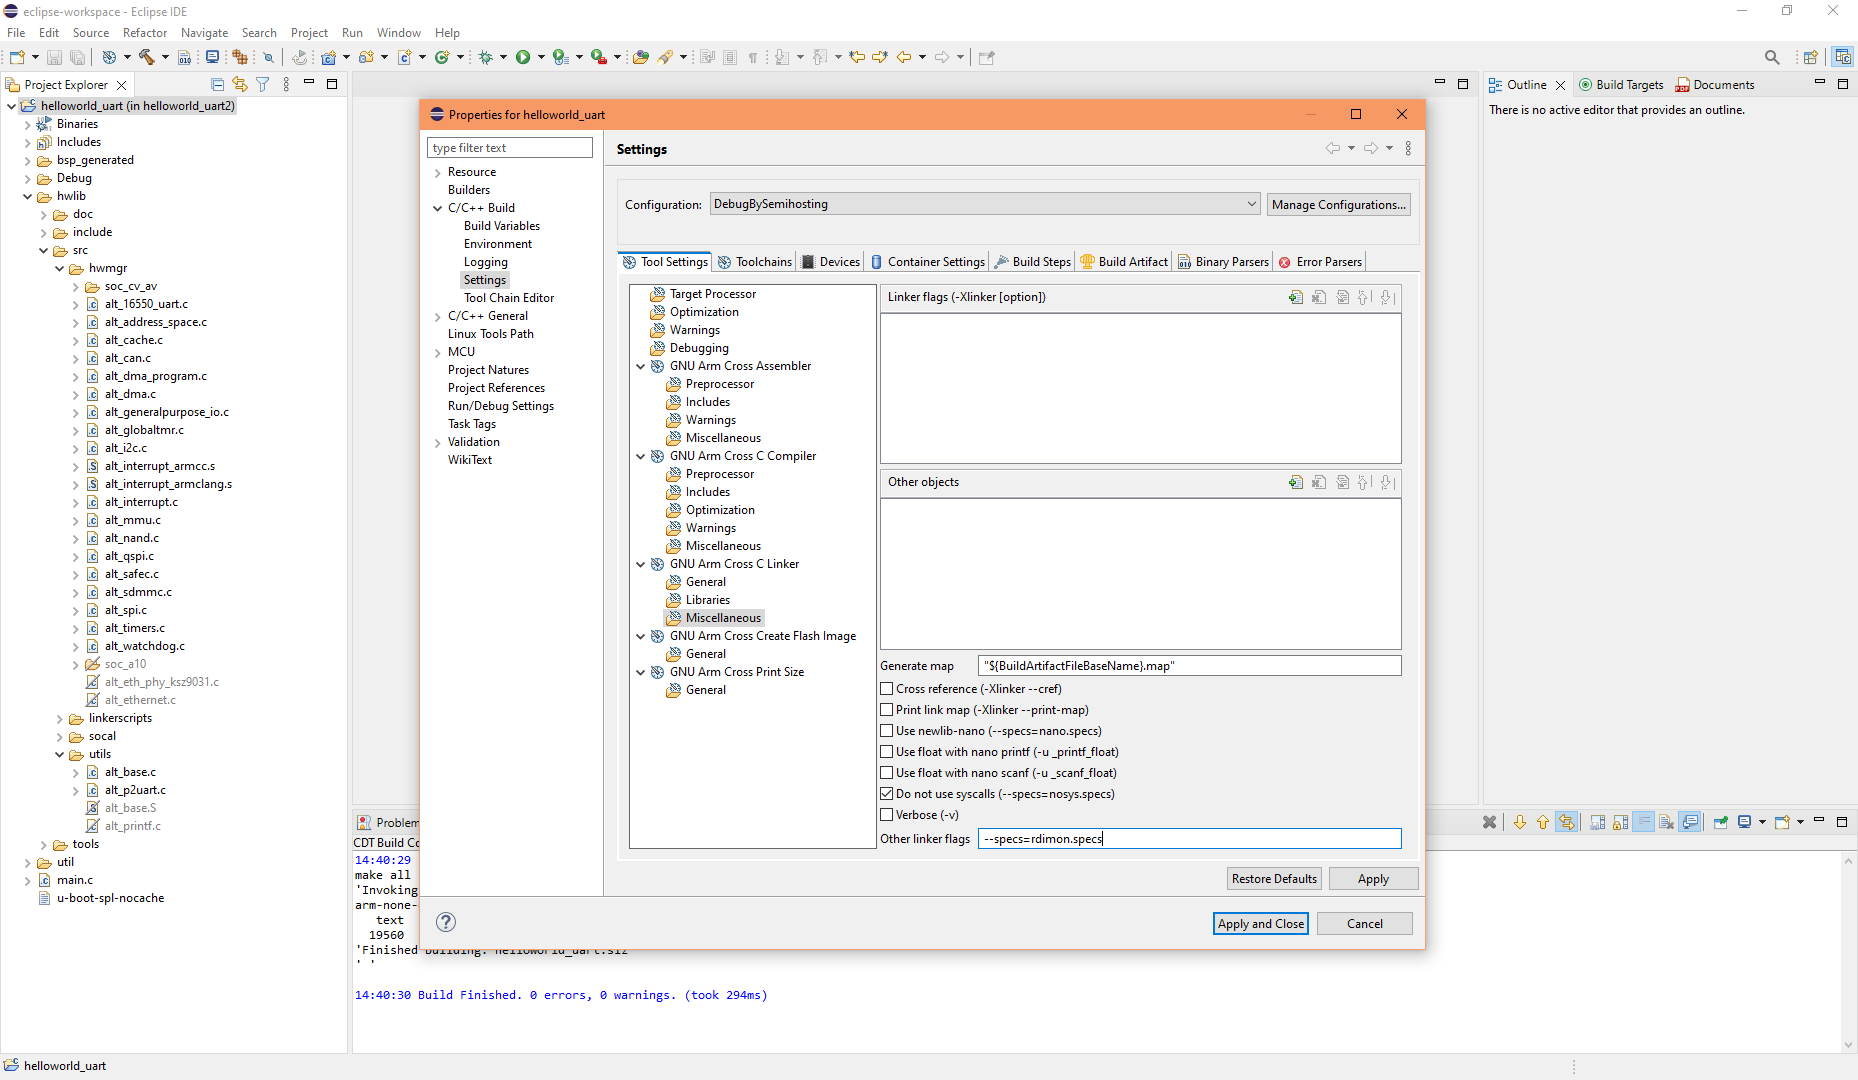
|
| 7.11. Create a new build configuration for printf to UART | |
|---|---|
|
If you find semihosting too slow, you may prefer to output debug messages to UART instead. I have written code to support this and is enabled by defining symbol TRU_DEBUG_PRINTF. We will create a separate build configuration for this. We will copy the Debug configuration for the new debug by UART configuration:
|
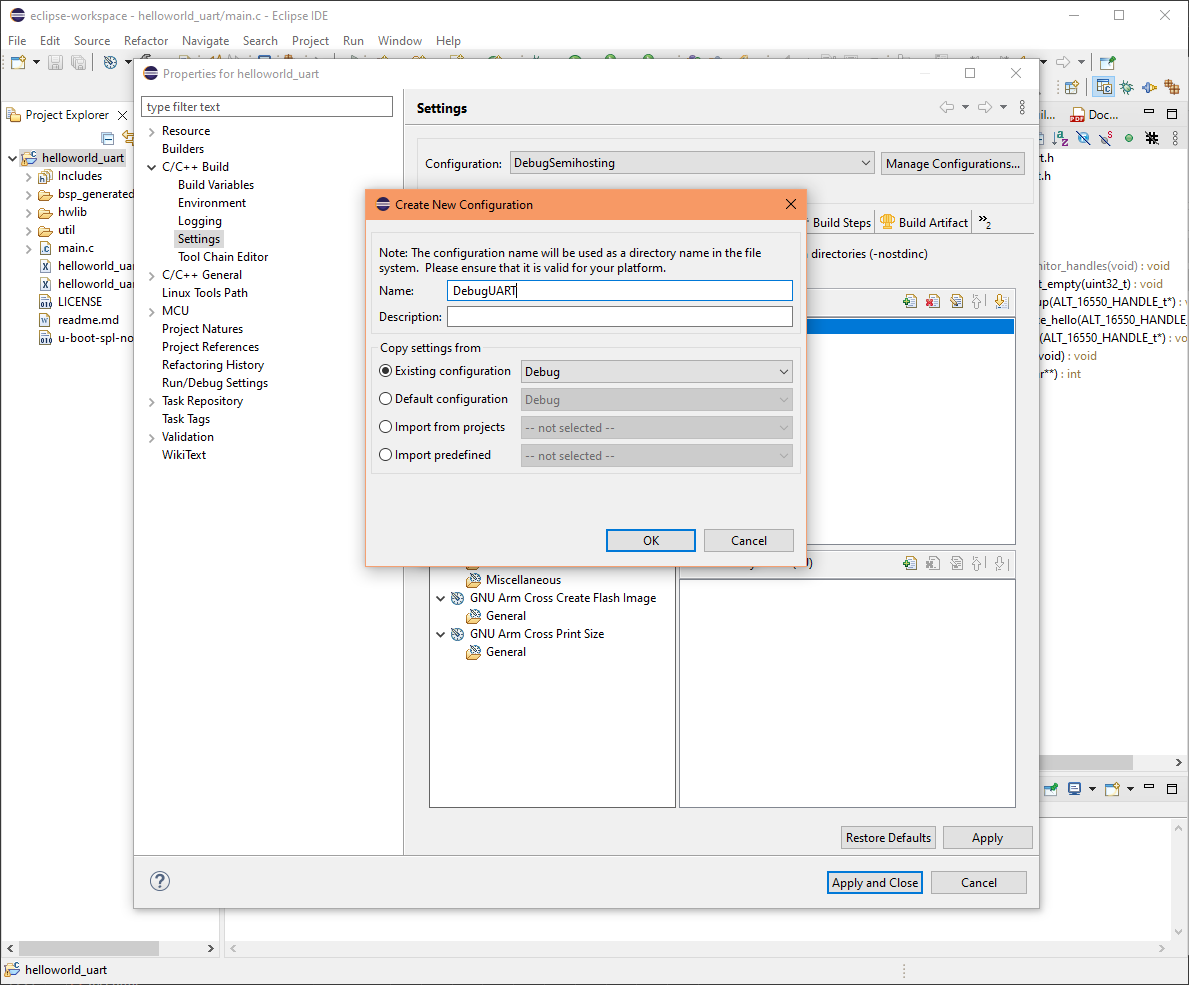
|
| 7.12. Configure user defines (symbols) for DebugUART build configuration | |
|---|---|
|
We will add a user defined symbol (a made up symbol) to enable the TRU_DEBUG_PRINTF to output to UART0. Steps:
|
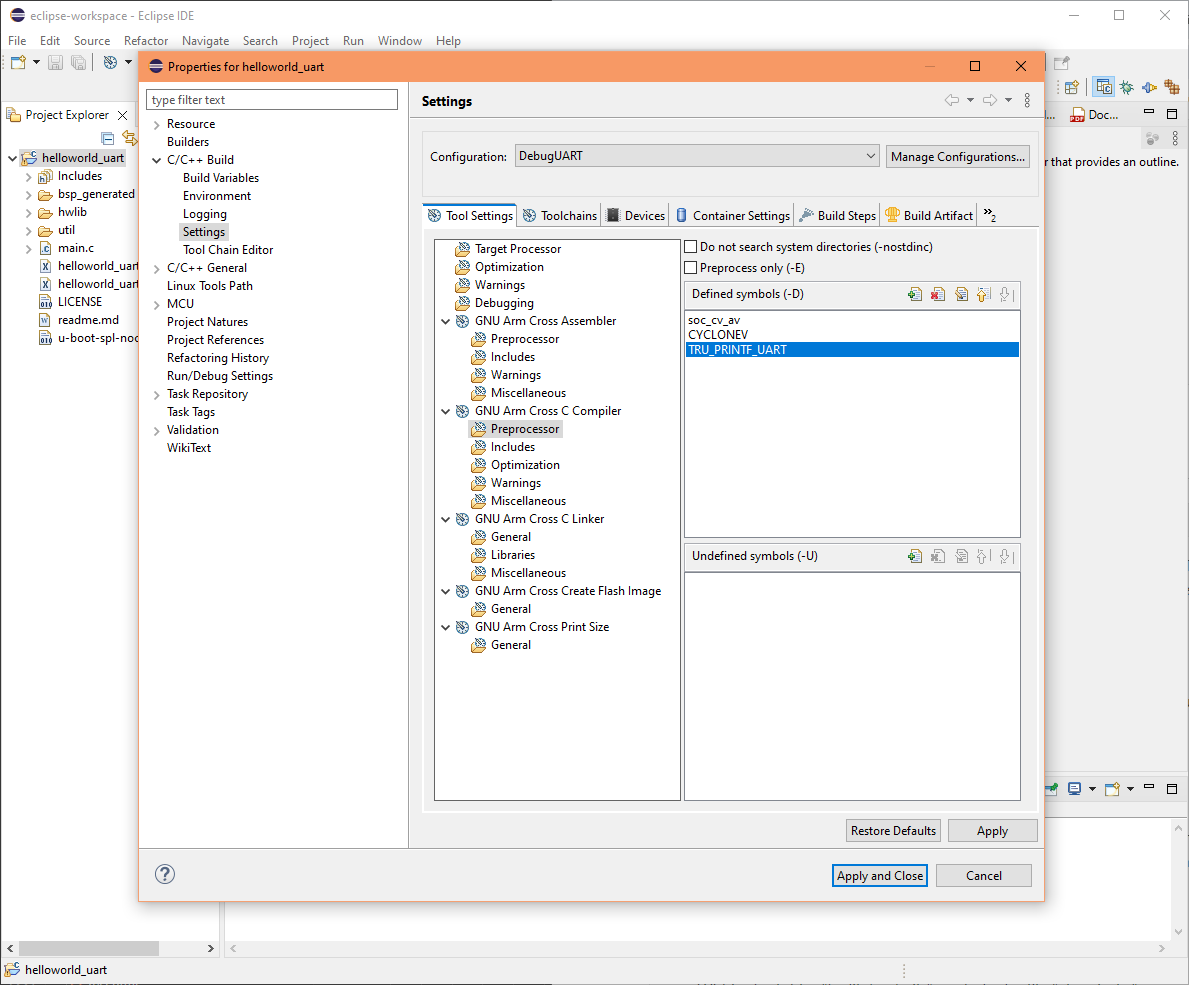
|
8. Excluding source files from the build
| 8.1 Exclude unneeded HWLib source files | |
|---|---|
|
At this point, starting the build (compile) process results in several errors. This is because of the HWLib library, to eliminate these errors we need to exclude some source files. Exclude Arria 10 SoC-FPGA sources (entire folder):
|
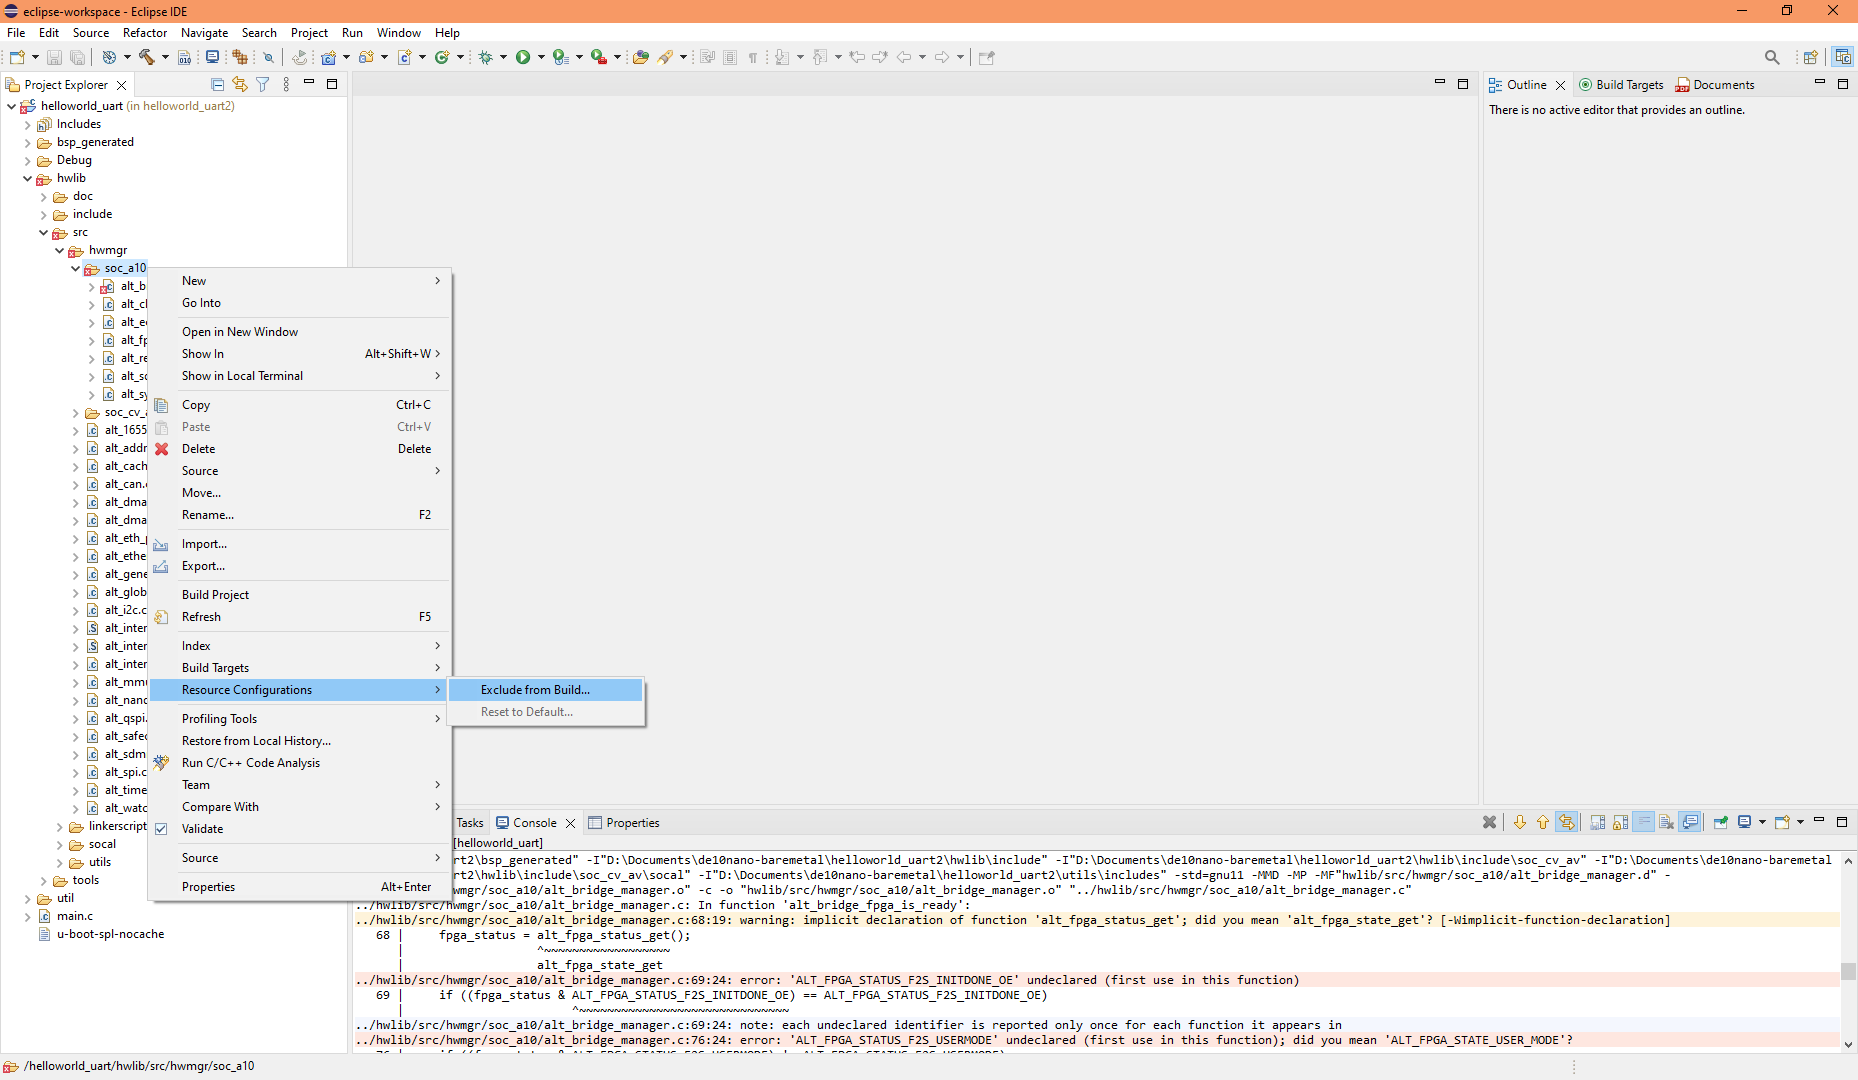
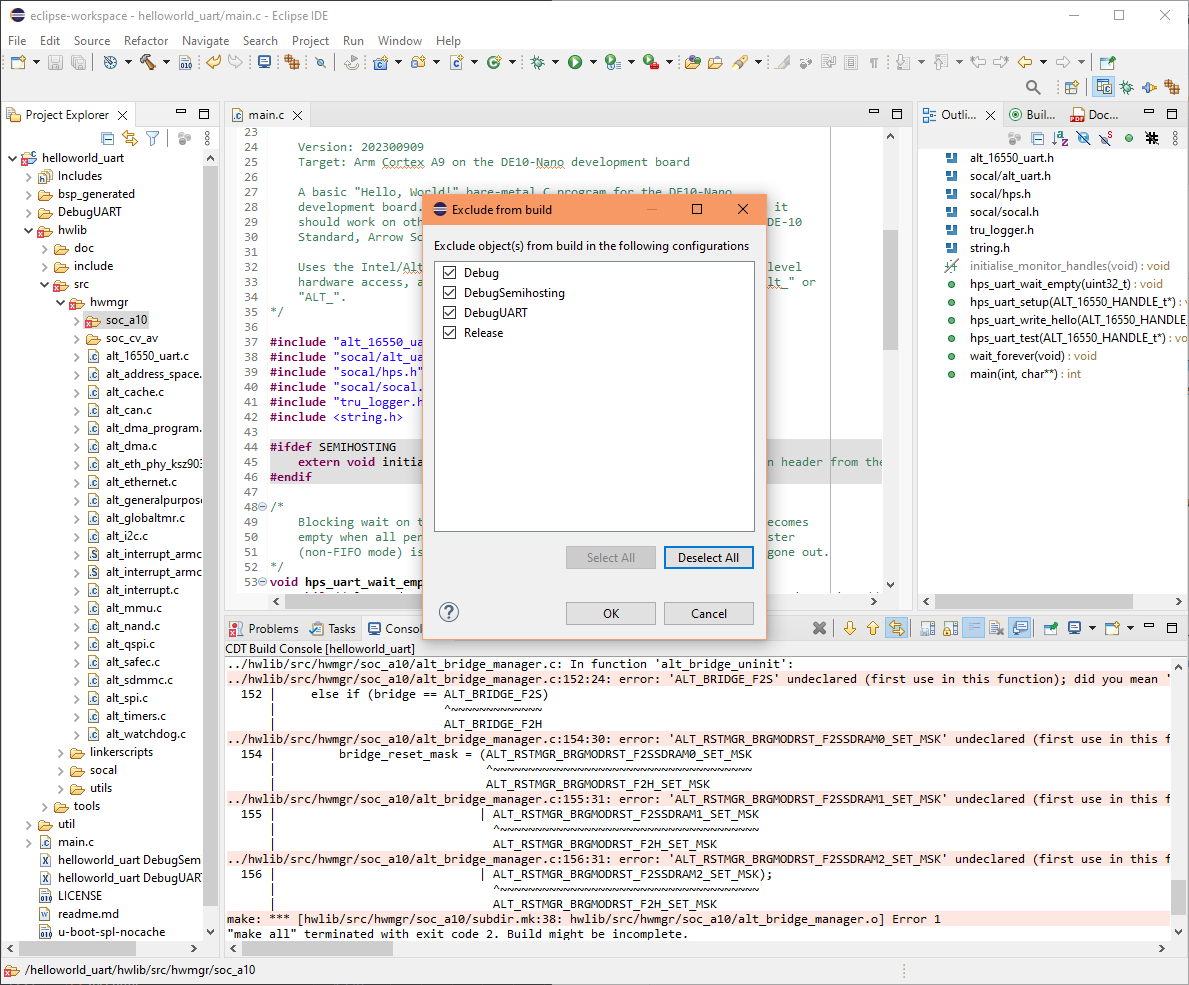
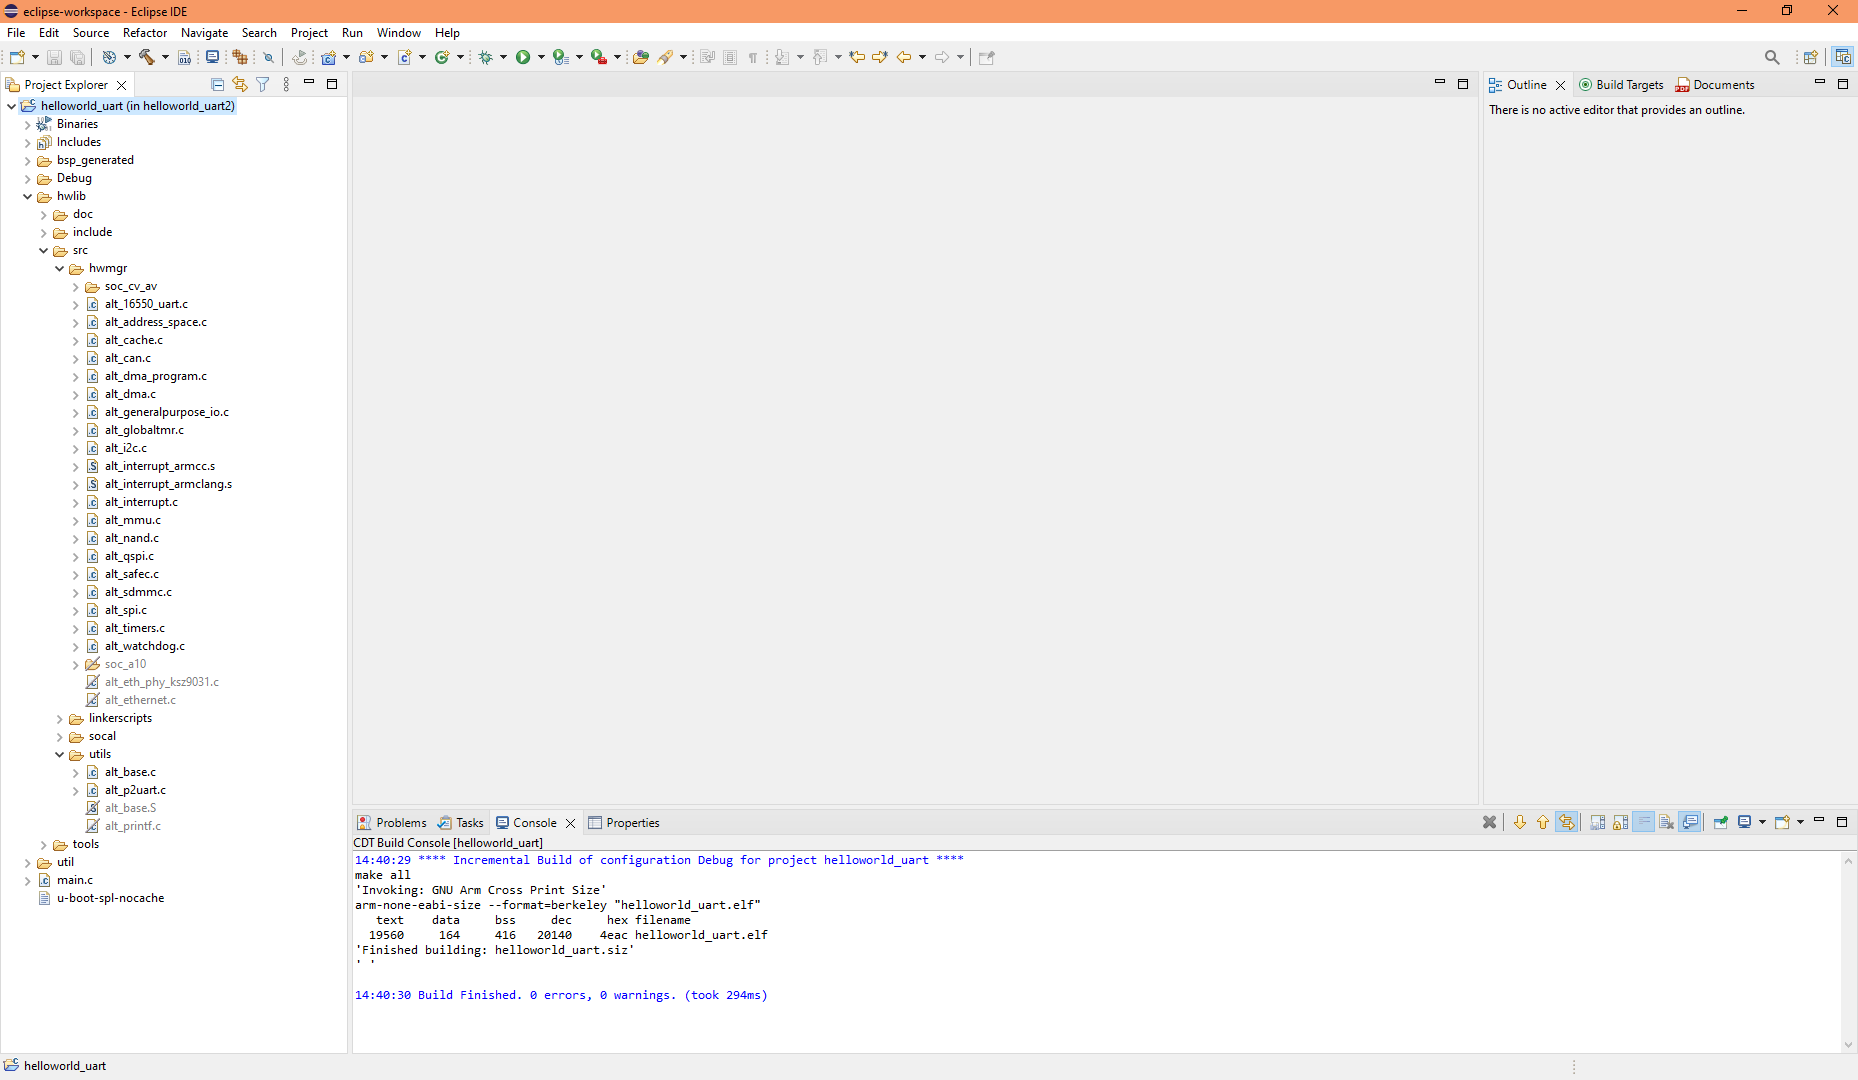
|
9. Creating GDB with OpenOCD debug configurations
| 9.1. Create a generic debug configuration profile | |
|---|---|
|
Let's create a debug configuration for any currently active build configuration. Steps:
|
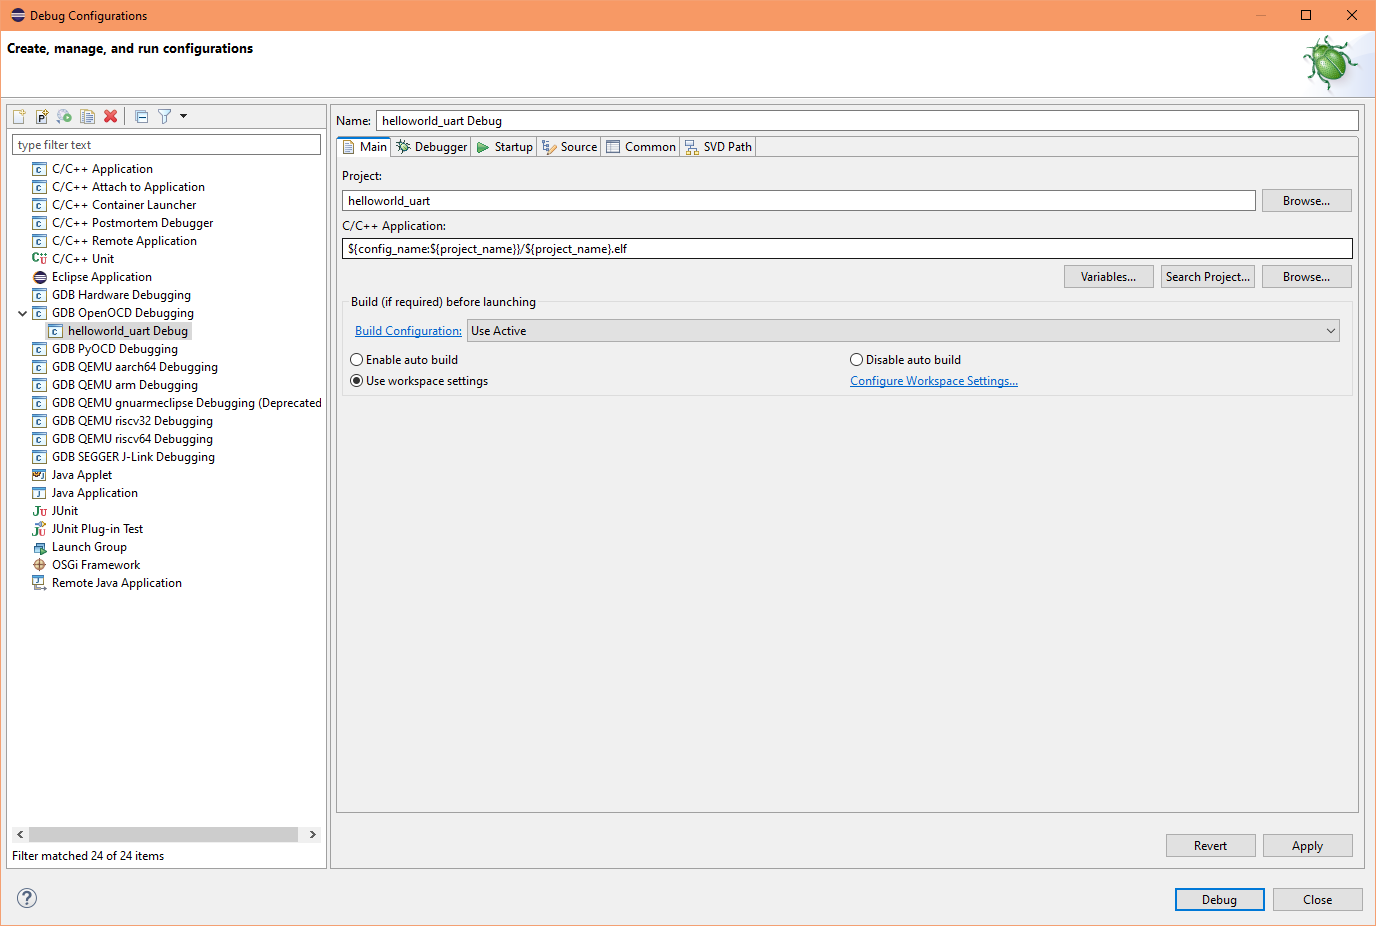
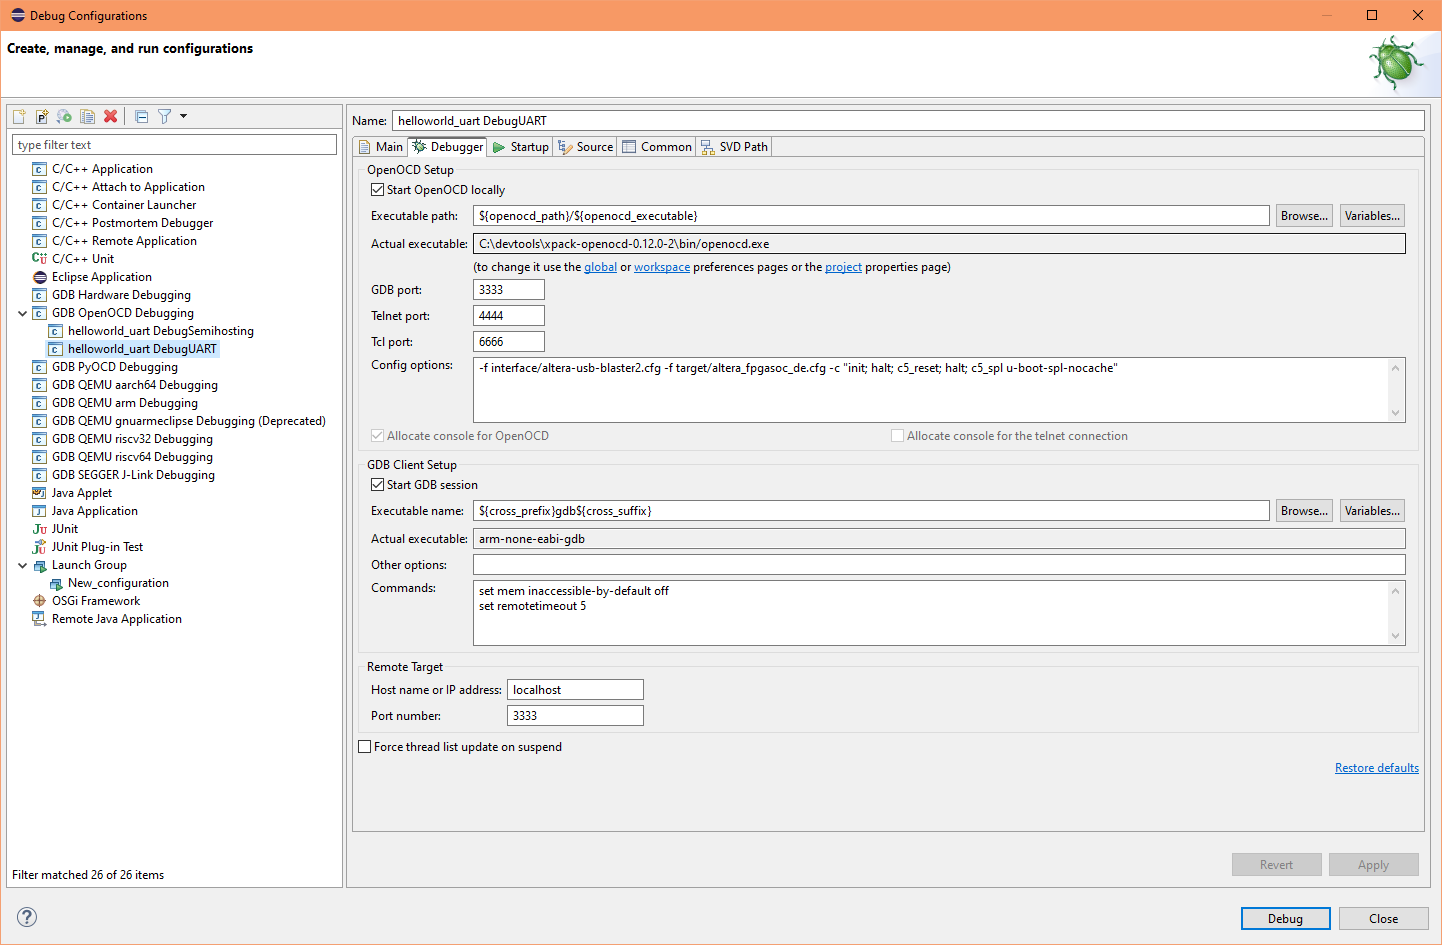
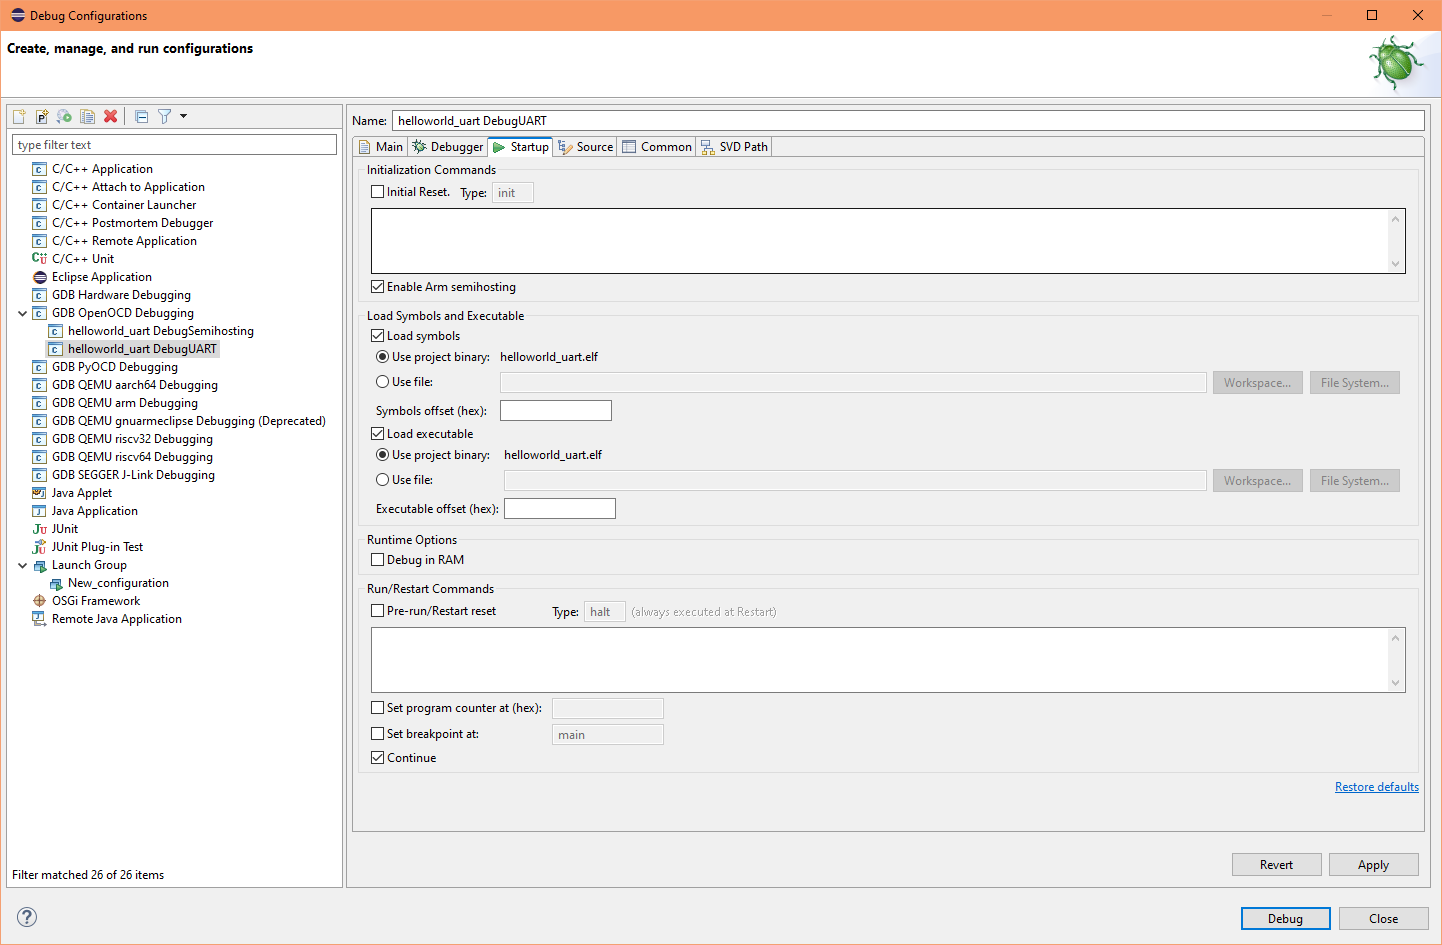
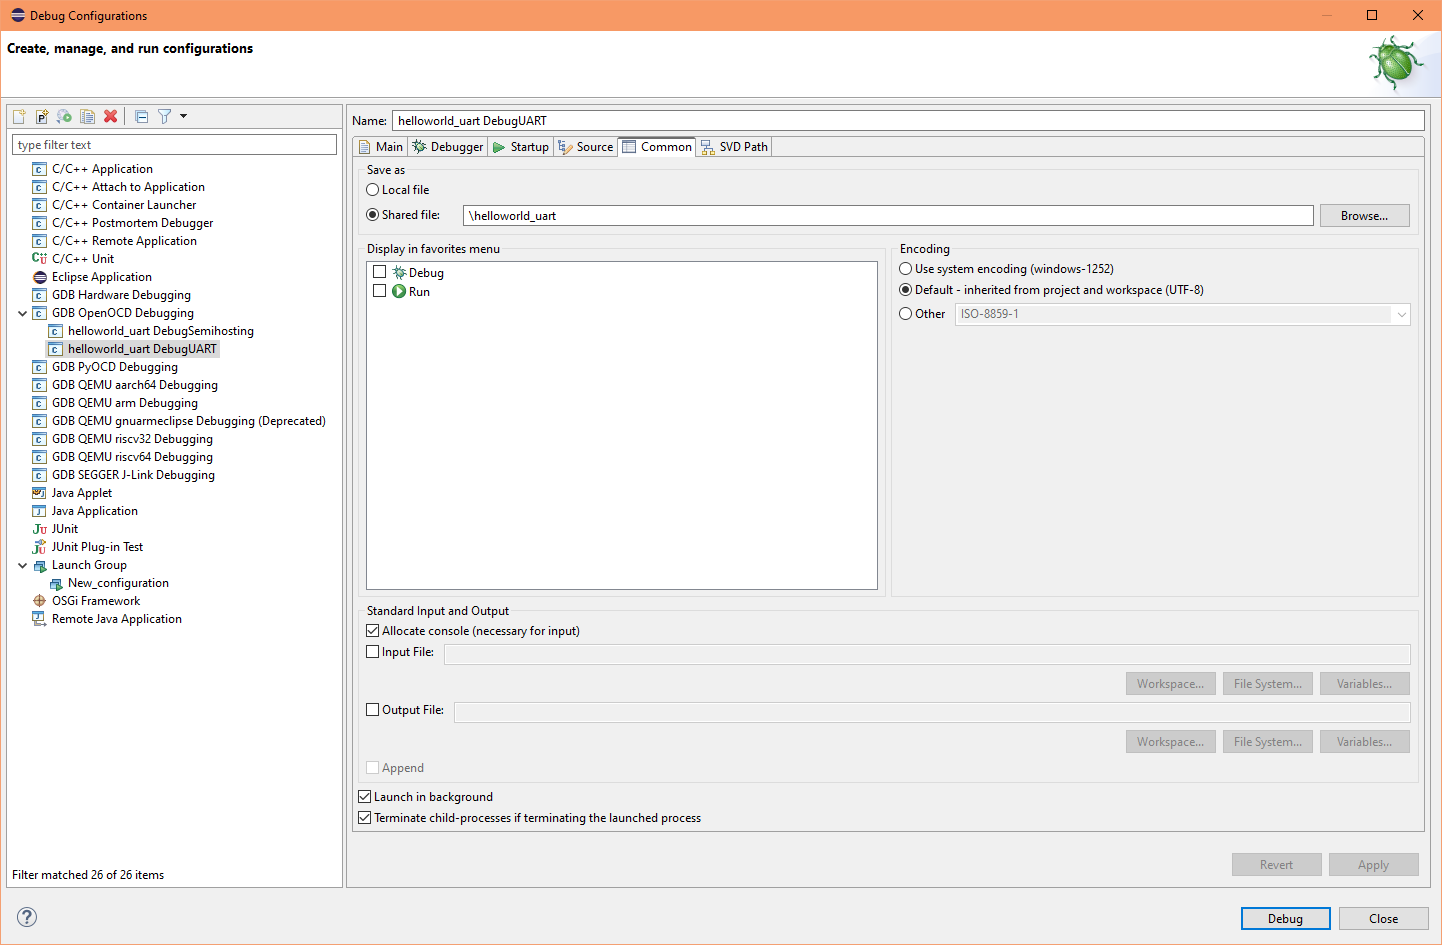
|
10. Known limitations
It seems the USB Blaster II works extremely slow through a virtual machine. I have tried Ubuntu 22.04.1 LTS (as guest) with Oracle Virtual Box and confirm that OpenOCD appear to hang trying to load U-Boot-SPL, if you can wait for about 4 minutes (yes, minutes to transfer a couple of kilobytes) it does finally complete!!
If you must use a virtual machine, I recommend to use an external compatible JTAG adapter (e.g. FTDI FT232H, FT2332H or FT4232H), connected to the DE10-Nano's JTAG header pins. You will also need to create/edit a suitable OpenOCD interface script for it - sorry I havn't the energy to do that atm.
11. Notes
Bare-metal C programming produces an elf or bin program for running natively on the target processor, in this case the dual core Arm Cortex-A9 (with hardware FPU and NEON). Compiling a program for a different type of processor is known as cross compiling. Bare-metal program runs bare, meaning without an OS and driver model, this naturally has low level development requirements (taken care of in my examples):
- requires board settings which are specific to user's configuration
- the usual standard C/C++ library cannot be used, e.g. C CRT and C++ STL libraries
- requires a suitable linker file
- requires a low level startup initialisation file
At startup or reset, as with any other hardware, the SoC-FPGA's processing system (HPS) requires initialising - a process that will set up the hardware components such as clocks, PLLs, RAM, interface bridges, peripherals etc. U-Boot-SPL is able to do this initialisation but your board settings will need to be compiled in.
Board settings come from your Quartus Prime project, more specifically from the settings of your HPS IP instance within Platform Designer. Platform Designer will generate hand-off files (plain-text data files) containing your configured settings that you generate. In the latest u-boot-socfpga (U-Boot fork) you will find a set of Python scripts (arch/arm/mach-socfpga/cv_bsp_generator/) for converting these hand-off files into U-Boot compatible C files. U-Boot requires the board settings to be provided as C files which are to be merged with its source files.
The example projects includes a U-Boot SPL that was compiled using my hand-off files but that means the configuration is specific to my Quartus Prime project. If you want to use your own configuration, then you must generate new hand-off files (result in folder hps_isw_handoff) using your own Quartus Prime project, convert them with the Python script, merge the source files (copy and paste) and then recompile U-Boot.
HWLib also requires one of the converted board settings C file (pll_config.h) to work. I have used mine for the example projects.
Most developers use Redhat's newlib library, a reduced C library that atleast provides us with some of the standard functionality. Currently, newlib library comes bundled with Arm's GNU C/C++ Toolchain so no need to install anything extra. By design, Redhat left some of the newlib functions as empty stubs, and they require overriding, these are taken care of by my newlib_ext.h/.c files.
For the linker and startup files I have simply used the ones from HWLib: cvav-ddr.ld and alt_base.c.
If I get the time, I will write a guide for configuring and building the U-Boot-SPL.
Currently, I am in the process of creating an Eclipse CDT plugin template extension wizard for the Cyclone V Soc-FPGA (DE10-Nano). I will release it when ready. This should make the creation of new projects alot easier for everyone.
Document date: Rev 4: 05 Feb 2024 - Added OpenOCD TCL script for USB Blaster II
Document date: Rev 3: 12 Dec 2023 - Updated tools to newer versions
Document date: Rev 2: 04 Dec 2023 - Updated OpenOCD target script
Document date: Rev 1: 27 Mar 2023